That glacier looks closer than it feels.
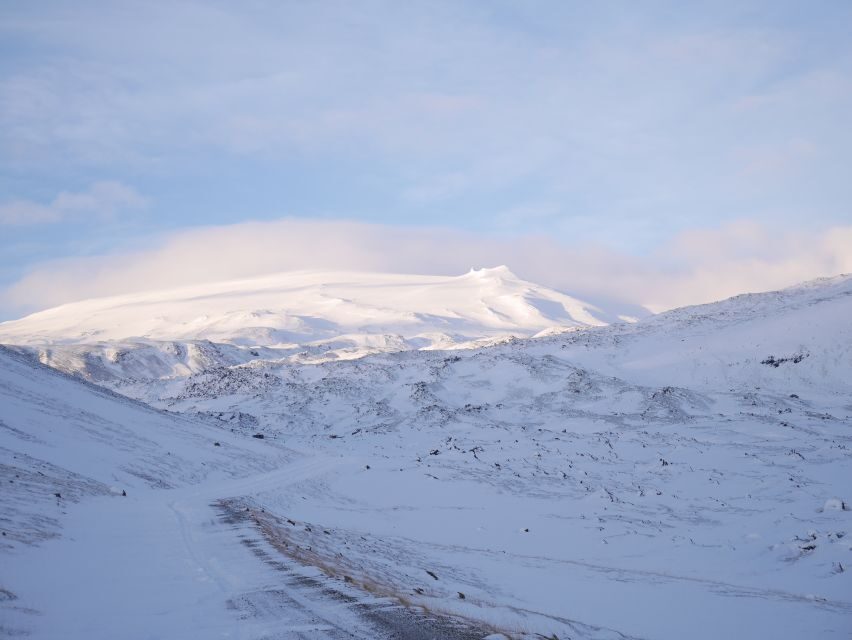
This hike to Snæfellsjökull, a glacier-covered volcano rising to 1,446m, mixes serious mountain gear with wild Western Iceland scenery. You start on the Snæfellsnes peninsula, walk rocky ground to the glacier base, then move onto icy terrain where ropes and crampons make the summit climb possible—weather and all.
I love two things most: the specialized guide-led glacier setup (crampons, harness, ice axes, ropes), and the way the day builds from walking to a proper summit moment with panoramic views over the peninsula. One real drawback: the tour is not as “easy for most people” as the wording can suggest—if you’re not used to uneven uphill terrain, you’ll feel it.
If you’re the type who wants the views without the workout, you may feel misled.
In This Review
- Key highlights you’ll feel on your boots
- Snæfellsjökull glacier-volcano: the big prize on Snæfellsnes
- Timing and route: what the 6.5 hours actually mean
- Getting glacier-ready: included gear and safety coaching
- The summit climb: 1,400m versus going all the way to 1,446m
- Difficulty: why this can feel harder than the label says
- Price and value: what $504 pays for (and what it doesn’t)
- Logistics: meeting points, drop-off, and the transport catch
- Packing checklist that keeps you warm and safe
- Weather in western Iceland: when the summit views are clear (or not)
- Who this tour fits best
- Should you book Arnarstapi: Snæfellsjökull glacier and volcano hike?
- FAQ
- How long is the Snæfellsjökull glacier and volcano hike?
- Where does the tour start and where do you get dropped off?
- Is transport included in the price?
- What’s included in the tour?
- Is food included?
- What clothing and footwear do I need?
- Do I need to bring my own glacier equipment?
- What is the difficulty level?
- Are there limits on group size?
- What languages are available and is there a live guide?
- What’s the cancellation policy?
Key highlights you’ll feel on your boots
- Glacier-volcano summit experience on Snæfellsjökull, up to 1,446m (or a turn point around 1,400m depending on conditions)
- Real mountaineering gear included: crampons, harness, ice axes, and ropes, with guidance on how to use them
- Two-stage hiking day: about an hour of rocky approach, then roughly three hours of ascent on glacier terrain
- Small group size (max 7), which usually helps on steep, rope-protected sections
- Jules Verne country vibes: Snæfellsnes peninsula has that Journey to the Center of the Earth fame, and the view payoff matches it
Snæfellsjökull glacier-volcano: the big prize on Snæfellsnes
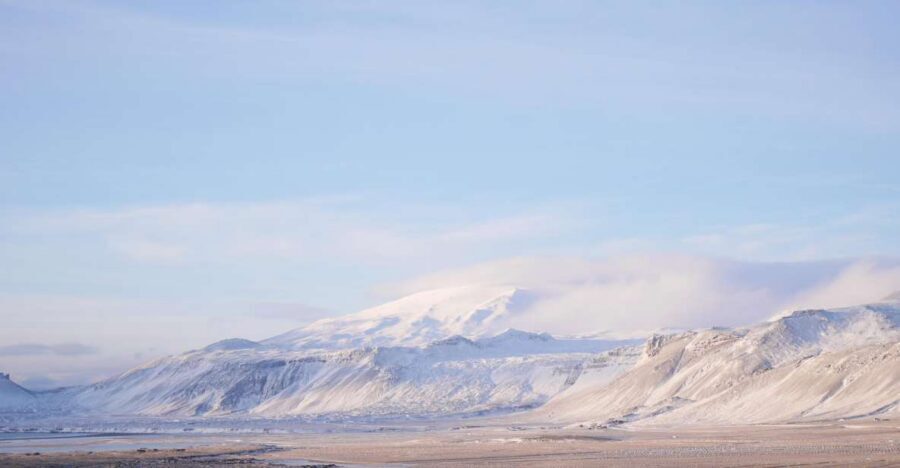
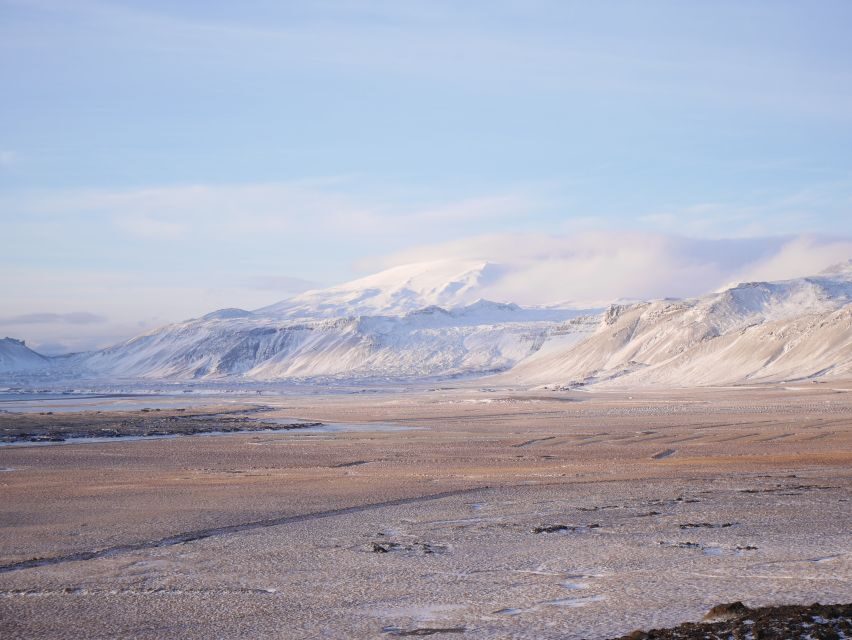
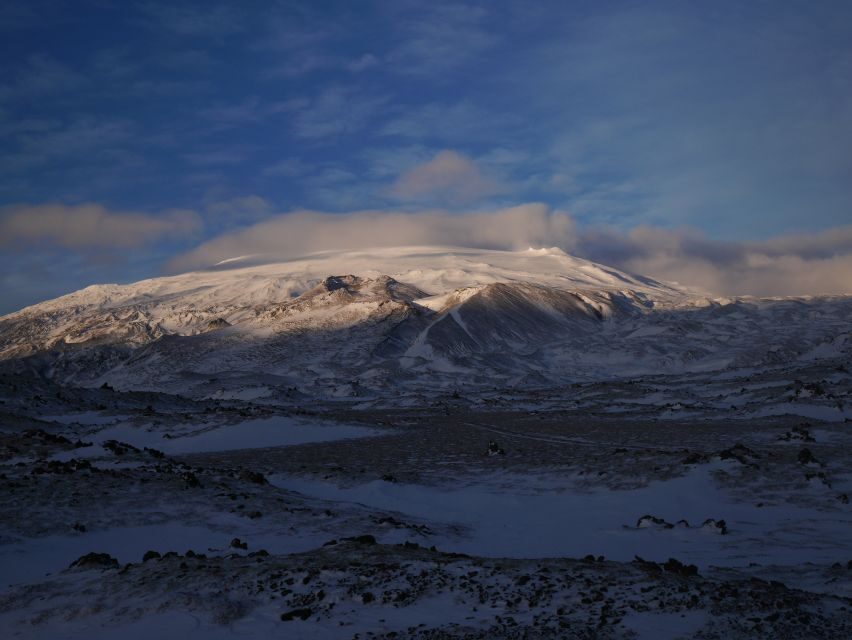
Snæfellsjökull isn’t just a glacier you photograph from a road. It’s a volcano under ice, sitting on the Snæfellsnes peninsula in western Iceland. On a clear day, you can look out across the peninsula and feel how dramatic this corner of the country really is—windy, spare, and sculpted by weather for ages.
What makes this tour interesting is the way it translates that drama into a guided, step-by-step hike. You’re not just trekking. You’re switching surfaces—from rocky ground to glacier ice—so the day has two moods: first, the steady climb to the base; then the slower, careful progress up steep icy terrain.
And yes, the scientific and the literary both hang in the air here. Snæfellsnes is tied to Jules Verne’s Journey to the Center of the Earth, and seeing the glacier-volcano up close is the kind of “this is why that story exists” moment.
Timing and route: what the 6.5 hours actually mean
The day runs about 6.5 hours total, and the actual hiking time is typically around 5–6 hours. That range matters, because Iceland weather can change quickly and the glacier conditions can shift your pace.
Here’s the route flow you should picture:
1) Meet and start at one of two main options: Stapinn (Arnarstapi Center) or Snjófell Restaurant.
2) Walk roughly 1 hour along a rocky path to reach the base of the glacier.
3) Get geared up once you’re at the glacier: the group fits crampons, harnesses, ice axes, and ropes.
4) Hike about 3 hours toward the summit area.
5) Turn back and return along the same trail, usually 1–2 hours depending on conditions and daylight.
The tour’s description often sounds straightforward: “not too challenging.” But the reality of glacier terrain is different. Even when a hike is “suitable for most people,” you still need to handle uneven ground, traction gear, and a steep, rope-protected upper section.
If you’re deciding based on energy level, plan for a workout. People can have a great time and still be properly tired by the end.
Getting glacier-ready: included gear and safety coaching
This is a guided mountaineering-style glacier hike, so the “included” part is not a small detail. The tour provides the glacier gear, and the guides coach you on how to use it before you commit to the steep stuff.
At the glacier base, expect a gear fitting that includes:
- Crampons for traction on ice
- Harness for safety
- Ice axes
- Ropes (protecting and managing movement on steeper sections)
A good guide experience matters a lot on glacier days. The tone here is practical: you want to know how to step, where to place your weight, and how to move without panicking when the slope tilts up. When everything clicks, it makes the summit section feel like a controlled adventure instead of a stress test.
One useful tip from the broader experience: bring gear inside your clothing system, not just your hiking boots. Reviews and operator notes emphasize weather-appropriate clothing, and that no cotton rule is not just fussiness—it’s about staying dry and warm when cold wind and wet conditions hit.
Also, remember that guides can turn you around if they see you’re not in good shape or not wearing proper clothing. That’s not punishment. On a glacier, it’s how the group stays safe together.
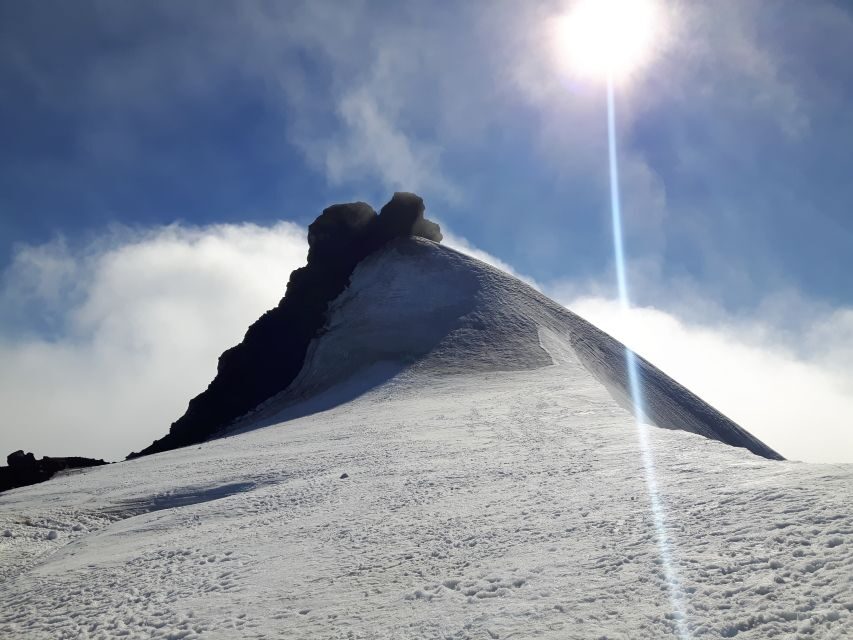
The summit climb: 1,400m versus going all the way to 1,446m
The core thrill is the ascent. After the gear check, you’re looking at roughly three hours of hiking toward the top, then a decision point near 1,400m versus pushing up to 1,446m.
Two things define this part of the hike:
1) It’s a steep slope.
2) The summit approach is protected with ropes.
That rope protection is a big deal. It gives structure on the steepest terrain, so even if you’re cautious (or a bit slow), you’re moving with the right safety system in place.
On clear days, the views are described as beautiful over the peninsula. In low visibility, you still go through the motions and complete the hike, but the summit “wow” may be muted by clouds and fog. Either way, the experience is still real: stepping onto glacier ice under a volcano peak is something your brain files under unforgettable.
The stop at the top is also part of the value. You’ll have time for lunch and to take in the panorama (or at least soak in the glacier scale and the feeling of being up there).
Difficulty: why this can feel harder than the label says
Let’s talk honestly about effort. The tour information says the hike is “not challenging” and suitable for most people, but the glacier format changes the game.
This is where you should be honest with yourself:
- If you don’t hike regularly, you may struggle with the steep uneven uphill.
- If you’ve never walked on tricky traction surfaces, you’ll need time to adjust.
- Cold, wet weather can make your feet feel heavier—especially in shoulder seasons.
One May experience stood out for a common pattern: cold and wet feet during the climb, followed by a noticeable improvement once the group was on the ice and started the steepest section. That’s a reminder to treat your clothing plan as insulation, not decoration.
And a couple of reports raise a key consideration: some people felt the pace and guidance didn’t match their needs—like when the guide moved ahead quickly during stretches off the main glacier action, leaving less time for explanations. On a rope-protected climb, that pacing might not change safety, but it can affect how much you learn and enjoy the process.
So, if you’re new to this kind of hike, you’ll probably enjoy it most if you:
- move steadily,
- ask questions early,
- and accept that Iceland weather and glacier conditions control the tempo.
Price and value: what $504 pays for (and what it doesn’t)
At $504 per person for about 6.5 hours, this is not a budget activity. But it’s also not a “pay for a view” sightseeing ticket.
You’re paying for:
- a local guide trained for glacier hiking,
- glacier gear included (crampons, harness, ice axes, ropes),
- and a small group limited to 7 participants.
What you are not paying for:
- transport to/from the meeting point,
- clothing (including essential layers like snow gear),
- and food (you bring snacks and packed lunch).
That’s why the “value” depends on your situation. If you’re starting with proper shoes, layers, and you can reach the meeting point easily, the price starts to make more sense. If you have to solve transport yourself and you also need to buy clothing, the total cost can sting.
Two other value notes to consider from real-world experiences:
- Some people felt the time on the glacier didn’t match expectations and found the price too high for the shorter duration.
- Others felt the guide experience was top-notch and made the climb feel smooth and safe.
So here’s the practical way to judge it for yourself: this price only feels fair if you want glacier training plus safety equipment, and you’re prepared for real effort.
Logistics: meeting points, drop-off, and the transport catch
The tour runs with two starting location options and matching drop-off locations: Stapinn, Arnarstapi Center, or Snjófell Restaurant.
Transport is listed as not included, and one clear complaint from real experiences is that having to drive yourself to the starting point can be a pain. If you’re renting a car, it’s usually manageable. If not, you’ll want a plan ahead—because the hike starts in a place where timing matters, and you don’t want to gamble with weather-driven delays.
If you’re building your day around Snæfellsnes, treat this like a half-day commitment with a fixed start. The glacier doesn’t care about your sightseeing wishlist.
Packing checklist that keeps you warm and safe
This hike is gear-and-weather dependent. The tour asks you to bring:
- Snacks and drinks
- Packed lunch
- Hiking shoes
- Snow clothing and weather-appropriate layers
A few clothing rules stand out:
- No cotton. Use synthetic or wool layers that keep warmth when damp.
- Wear weather-appropriate clothing because conditions change fast.
- Reviews also point out that you may need extra protection like sur-pants, gloves, and a hat when it’s rainy or foggy.
Glacier days can feel wet even when it’s not snowing. The wind gets under layers. Plan for “cold and wet” as your default, and then hope for something better.
Practical strategy: dress in layers that you can vent slightly if you heat up on the rocky approach, but that protect you again once you’re moving slowly on the icy section.
Weather in western Iceland: when the summit views are clear (or not)
Iceland weather can flip quickly, and the tour’s guidance is consistent with that reality: wear the right clothing, and trust the guides to adapt.
On clear days, you get those sweeping views over the peninsula. On low-visibility days, you still do the climb, but the summit might be more about the effort, the gear, and the sense of altitude than the photo-perfect panorama.
Either way, the best mindset is to focus on what you can control: traction on the ice, staying warm, and following instructions.
Who this tour fits best
This is best for you if you:
- want a guided glacier experience (not just a walk outside the ice zone),
- are comfortable with a steep hike and uneven terrain,
- show up in proper cold-weather layers,
- and like learning how gear works as part of the adventure.
It might be a rough choice if you:
- hate physical exertion,
- have limited hiking experience on hills or uneven ground,
- or are planning to wear cotton or inadequate cold-weather clothing.
And a final note: because guides can turn you around for safety, it’s worth arriving mentally ready. If you show up prepared and move steadily, you give yourself the best shot at an excellent summit time.
Should you book Arnarstapi: Snæfellsjökull glacier and volcano hike?
Book it if you want the real thing: a glacier-volcano hike with crampons, ropes, and a guide who manages the climbing safely in small-group conditions. The climb is spectacular, the summit stop is memorable, and the day feels like more than a drive-by.
Skip or reconsider if you’re expecting a casual walk, or if you don’t have an easy plan to reach the meeting point. Also think twice if you’re not ready for cold, wet conditions and a steep, rope-protected upper section.
If you do book, your best “upgrade” isn’t a different tour—it’s showing up correctly dressed. Do that, and the mountain will meet you halfway.
FAQ
How long is the Snæfellsjökull glacier and volcano hike?
The tour duration is about 6.5 hours total, and the glacier hike portion (including getting to the glacier and back) is usually around 5–6 hours.
Where does the tour start and where do you get dropped off?
There are two starting and drop-off options: Stapinn (Arnarstapi Center) and Snjófell Restaurant.
Is transport included in the price?
No. Transport is not included.
What’s included in the tour?
The tour includes a local guide and glacier gear.
Is food included?
No. Food is not included, so bring snacks and a packed lunch.
What clothing and footwear do I need?
Bring hiking shoes and snow-weather clothing. The tour also notes no cotton, and you should wear weather-appropriate layers.
Do I need to bring my own glacier equipment?
No. Glacier gear is included, including items like crampons and harness equipment used for the glacier hike.
What is the difficulty level?
It’s described as not challenging and suitable for most people, but it is a glacier mountaineering-style hike on uneven, steep terrain. If you don’t hike much or aren’t used to uphill uneven ground, you might find it difficult.
Are there limits on group size?
Yes. The group is small, limited to 7 participants.
What languages are available and is there a live guide?
The tour has a live guide in English.
What’s the cancellation policy?
You can cancel up to 24 hours in advance for a full refund.