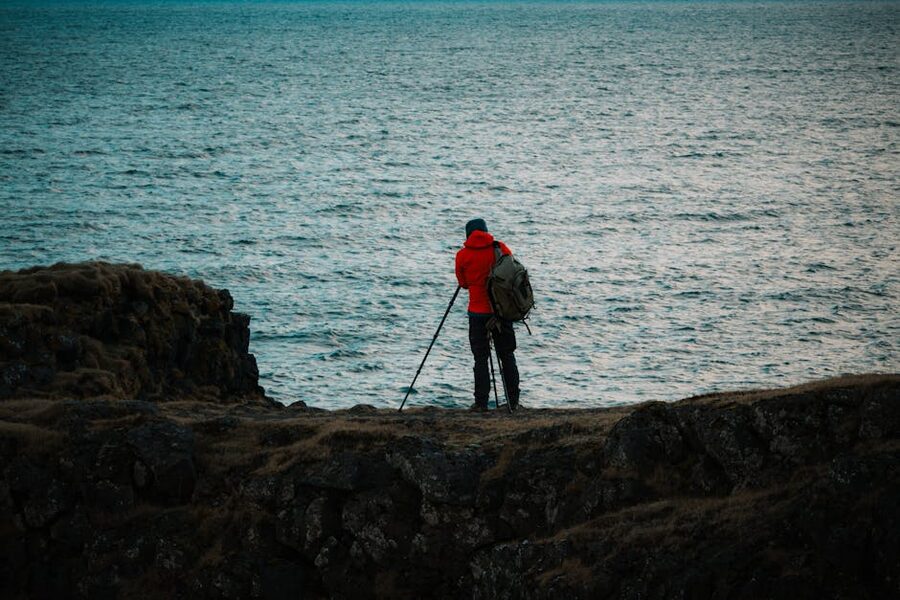
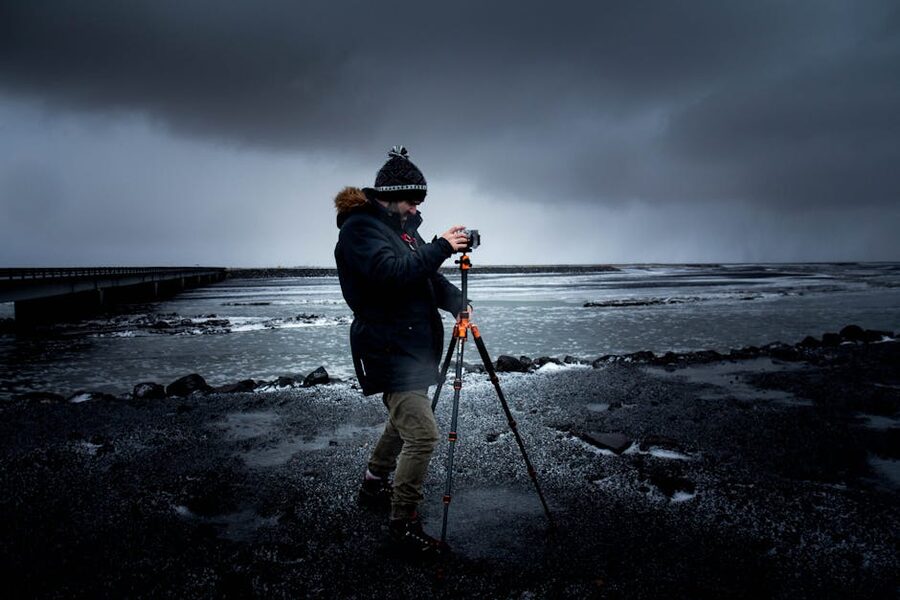
The first time I drove a German photographer to Stokksnes, we had four hours of light to work with and a forecast that promised rain by 3 p.m. He spent forty minutes setting up a single composition, tripod legs splayed wide on the wet sand, the front element of his lens about ten centimetres above a tide pool, the wind catching his rain cover and slapping it against the carbon-fibre. I watched from the car. He took maybe eight frames in that whole time. When he finally got back in, he said, “That is the best one I will ever make of this place.” The forecast held, the rain came in at 2:50, and we drove back to Höfn happy.
That’s a photography tour in Iceland in one short story. Long waits at one location, very few frames, weather you can’t argue with, and the quiet certainty that the shot you’re after is worth standing in the cold for. If you’ve thought about coming here with a camera and you’re trying to work out whether to book a workshop, drive the Ring Road yourself, or do something in between, this is the long version of the answer I usually give.
In This Article
- What a photography tour actually is
- The seasons, winter is the spine
- Winter (November to March)
- Summer (June to August)
- Shoulder seasons (April–May, September–October)
- The locations that earn their reputation
- Stokksnes and Vestrahorn
- Jökulsárlón and Diamond Beach
- Kirkjufell and Kirkjufellsfoss
- Skógafoss and Seljalandsfoss
- Reynisfjara
- Þingvellir
- The Highlands, Landmannalaugar and Kerlingarfjöll
- Húsavík and the whales
- Goðafoss, Hraunfossar, Snæfellsjökull
- Photographing the aurora, the technical bit
- Ice caves, the winter exclusive
- The operators worth your money
- Self-drive vs guided, when each is right
- What it actually costs
- Gear, what actually matters here
- The dark side, weather kills schedules
- How I’d plan it
What a photography tour actually is
The phrase covers a wider range than it sounds like. At one end you’ve got a half-day “photo tour” out of Reykjavík where a guide drives a small group around a few sights and tells you when to put a polariser on. At the other end you’ve got a 10- or 14-day workshop led by a working landscape photographer, with five to ten participants in two 4x4s, hotels booked along a route built around sunrise and sunset times, and instruction in the field rather than in a classroom. Both are legitimate. They cost wildly different amounts and serve different people.
The thing they all share, and the thing that distinguishes a photo tour from a normal sightseeing tour, is the schedule. A regular Golden Circle bus arrives at Geysir at 11:15, gives you 35 minutes, and is at Gullfoss by 12:30. A photo tour might pull in at 7 a.m. before the coaches arrive, wait two hours for the steam to do the right thing in the cold, and then leave when the light flattens out. You go to fewer places. You stand in each one for longer. The driver-guide is also the photographer-guide, which means they know that the wind direction at Reynisfjara matters more than the time on a brochure.
Group sizes matter more than people realise. The good operators cap at six to ten participants for a multi-day workshop and rarely more than four for a private tour. Anything bigger and you spend the trip queuing for the same composition, which defeats the point. Cost goes up correspondingly. A three-day private photo tour with a guide-driver to yourself runs around 450,000 to 600,000 ISK; a 10-day group workshop with a known photographer is typically 4,500 to 6,000 EUR (around 650,000 to 870,000 ISK at current rates), accommodation included. More on that below.
The seasons, winter is the spine
If you only remember one thing about photo tours of Iceland, remember this: winter is the dominant season. The aurora is only visible from late August through April, the ice caves only exist from November through March, and the low-angle light that gives you golden hour for hours instead of minutes is a winter phenomenon. Most of the workshops you’ll see advertised by serious landscape photographers are December–February trips. There’s a reason for that.
Winter (November to March)
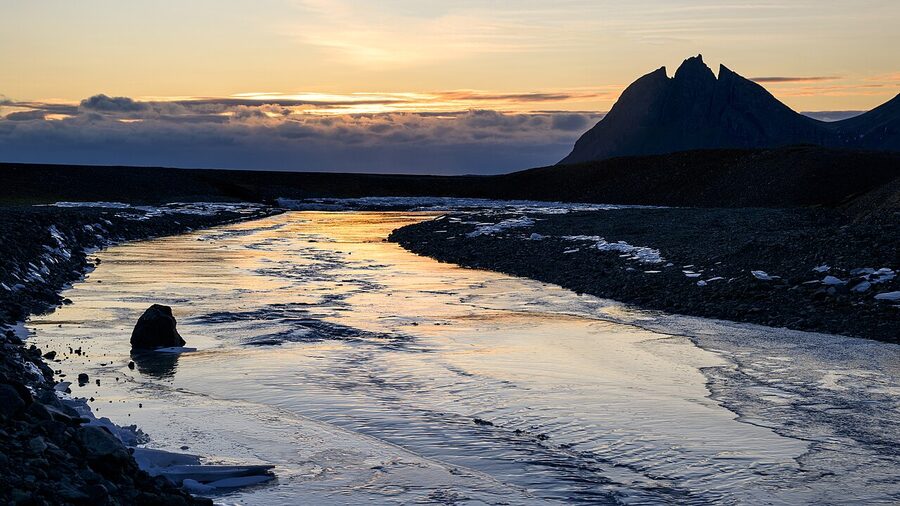
Here’s what winter gives you that no other season can. Daylight is short, about 4 hours in late December, climbing to 9 hours by mid-March, but the sun never gets very high above the horizon. That means a normal late-morning shot has the kind of warm, raking light a summer photographer would have to wait until 10 p.m. for. Sunrise and sunset blur into each other through a long blue hour. Skies tend to be more dramatic, heavy cloud, sudden clearings, the kind of light photographers describe as “moody” because there isn’t a better word for it. Snow simplifies a landscape. Rivers ice over and become geometric. The country is genuinely easier to photograph in winter than in summer, which is the opposite of what most travel content tells you.
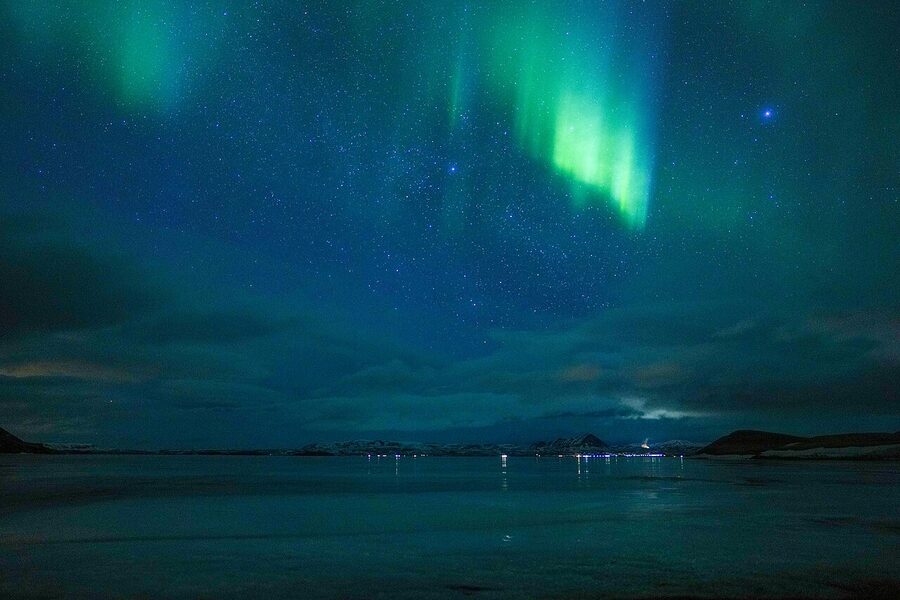
Then there’s the aurora. The northern lights have been recorded over Iceland between roughly the third week of August and the second week of April, but the season most photographers care about is October through March. You need three things: dark skies, a clear patch overhead, and enough geomagnetic activity to push the lights down to our latitude. The first one comes for free in winter; the other two require luck and the Met Office aurora forecast. (Check it at en.vedur.is. Green areas on the cloud map are clouded over; white areas are clear, and you want to be under the white.) On a strong night you can shoot the aurora from your hotel doorstep in Reykjavík. On a weak night you can drive ninety minutes east to a dark-sky valley and still get nothing. That’s photography here. You take the night you’re given.
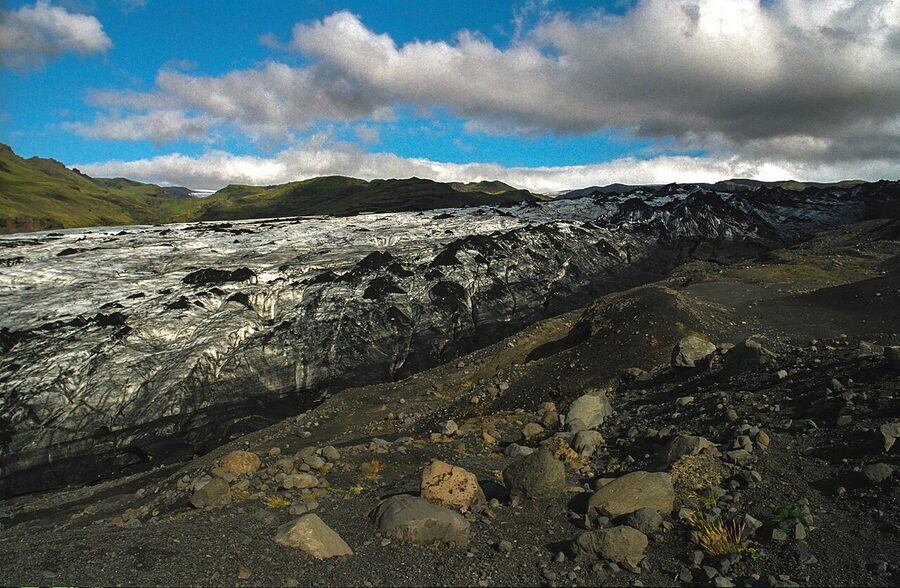
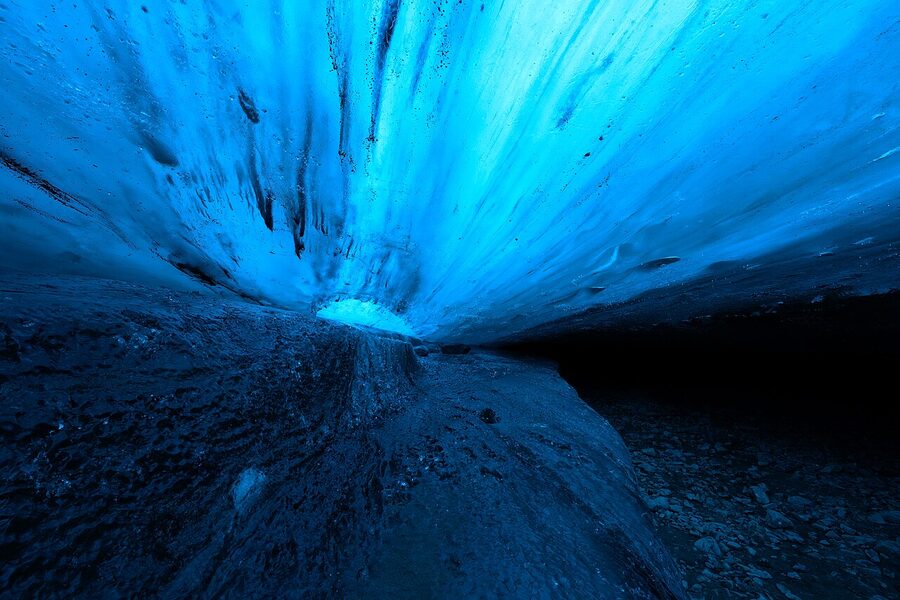
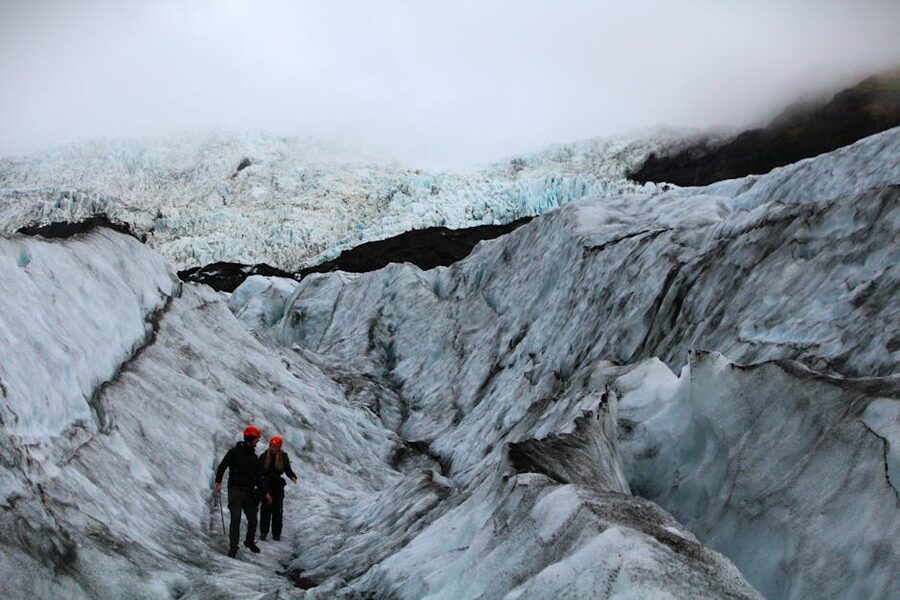
The other winter exclusive is ice caves. Glaciers form natural tunnels every summer when meltwater drills downward through the ice, and each autumn those tunnels refreeze into stable ceilings of clear blue ice. Guides spend October scouting which caves under Vatnajökull are safe to enter that season. By early November the first photo trips are running, and they keep running until late March, when meltwater starts coming through the roofs again. There’s no ice cave season the rest of the year. If you want to photograph one, you book a winter trip. More on the caves further down.
Cost-wise, winter is also when most of the well-known photo workshops run, so you’re booking against demand. Arctic Exposure’s “Aurora Borealis & Ice Cave” December workshop sold its 2026 dates by mid-2025. Iceland Photo Tours’ eight-day winter workshop with Iurie Belegurschi has six departures across November to March. If you want a specific photographer’s winter trip, plan twelve months ahead.
Summer (June to August)
Summer is the opposite shape. You get the midnight sun, about two months from late May to mid-July when the sun barely sets, which means continuous golden hour from roughly 10 p.m. to 4 a.m. depending on date and latitude. The light is softer, lower, and slower-moving than anything you’ll find in temperate latitudes. A landscape that looks ordinary at 2 p.m. is unrecognisable at midnight.
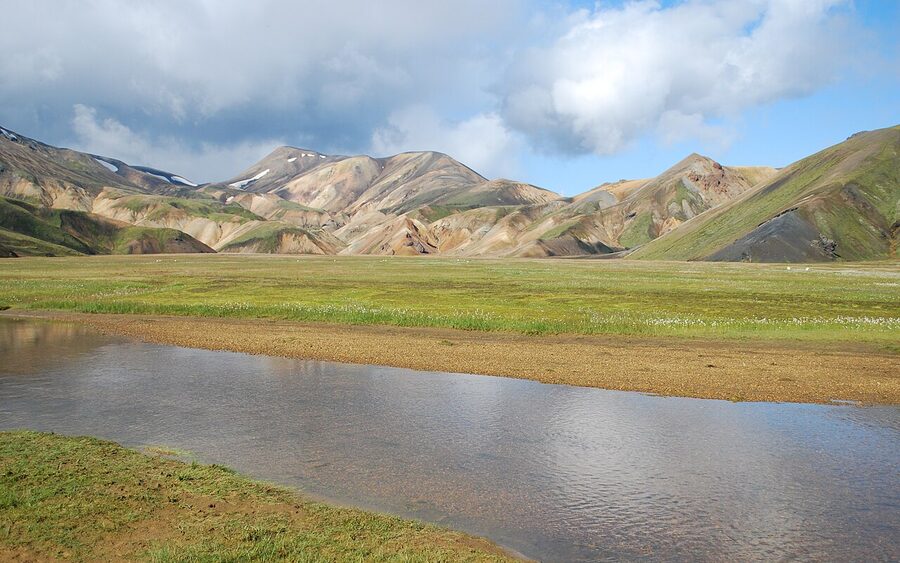
Summer also opens the Highlands. The interior is closed by snow most of the year, the F-roads (mountain tracks) only open from roughly mid-June to early September, and only for 4×4 vehicles. Landmannalaugar, Þórsmörk, Kerlingarfjöll, Askja: all summer-only. If you want to photograph the orange rhyolite mountains around Landmannalaugar or the steaming geothermal valleys at Kerlingarfjöll, summer is your only chance, and you need a vehicle that can ford rivers. This is where photo workshops earn their fees, getting you up an unmarked side track at 11 p.m. for the right angle on a crater you’d never have found on your own.
The other summer thing is wildlife. Atlantic puffins arrive at the cliffs around mid-April and leave by early August. The biggest colonies are at Látrabjarg in the Westfjords (most accessible cliff in Europe, you can lie down a metre from a puffin and not disturb it), Borgarfjörður eystri in the east, the Westman Islands, and the Dyrhólaey peninsula on the south coast. A 600 mm lens is unnecessary; most of the time you’re shooting puffins with an 80–200 because they’re that close. Mid-June to mid-July is peak; by August they’ve started leaving.
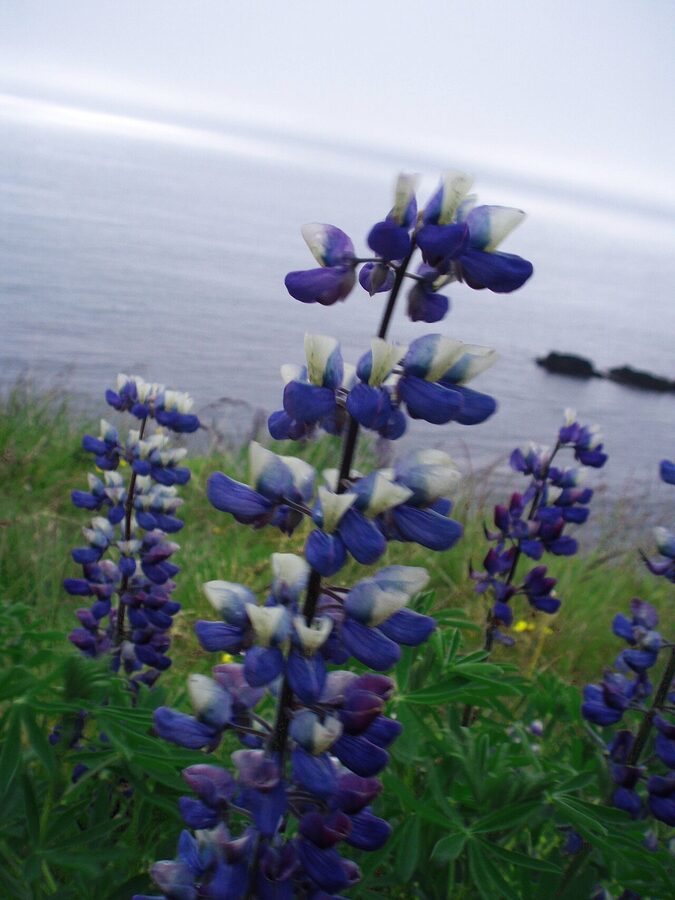
And then there are the lupines. Alaskan lupines (lúpína) were introduced in 1945 to stop soil erosion, took to the place far too well, and now blanket whole hillsides in violet from mid-June to mid-July. Locals are mixed on them, they outcompete native plants, but for one month a year they make the South Coast look like Provence with mountains. Workshops in late June time their itineraries around peak bloom.
The catch with summer is that it’s the busy season for normal tourists, the famous spots are crowded, and the midnight sun shooting schedule wrecks normal sleep patterns. You’ll be at Skógafoss with thirty other tripods at 1 a.m., fewer than at noon, but not empty. If you want isolation in summer, you go to the Highlands or the Westfjords.
Shoulder seasons (April–May, September–October)
The shoulder months are quietly some of my favourites for visiting photographers. By late September the autumn colours start, Iceland doesn’t have many trees, but the moor grasses turn copper and the moss on the lava fields takes on a yellow tinge. The first aurora of the season returns around mid-August. Tourist numbers drop. The Highlands are still open through mid-September. You can find combinations no other month gives you.
Late April and early May are the other shoulder. The puffins are back but the chicks haven’t fledged. Snow is still on the higher ground but the South Coast is drivable. Daylight is long enough to fit two distinct shooting sessions per day. Aurora is officially over but lingers into the second week of April some years. Operators run shoulder workshops at slightly lower prices than peak winter or peak summer, Arctic Exposure’s late-September fall workshops sit a few hundred euros under their February ones.
The locations that earn their reputation
You can spend two weeks photographing Iceland and not exhaust the iconic shots. Here’s the short list of locations that genuinely belong on a photo trip’s itinerary, and what they give you.
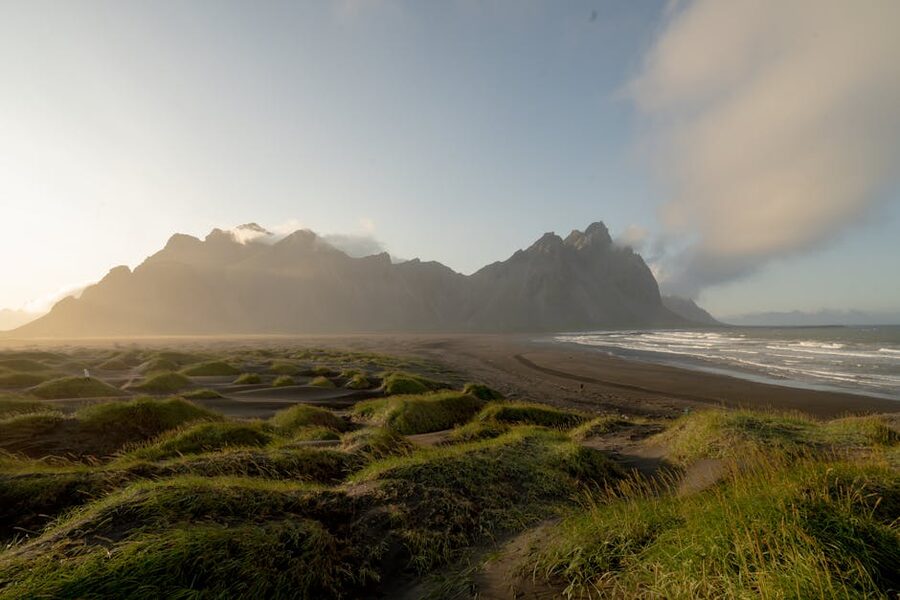
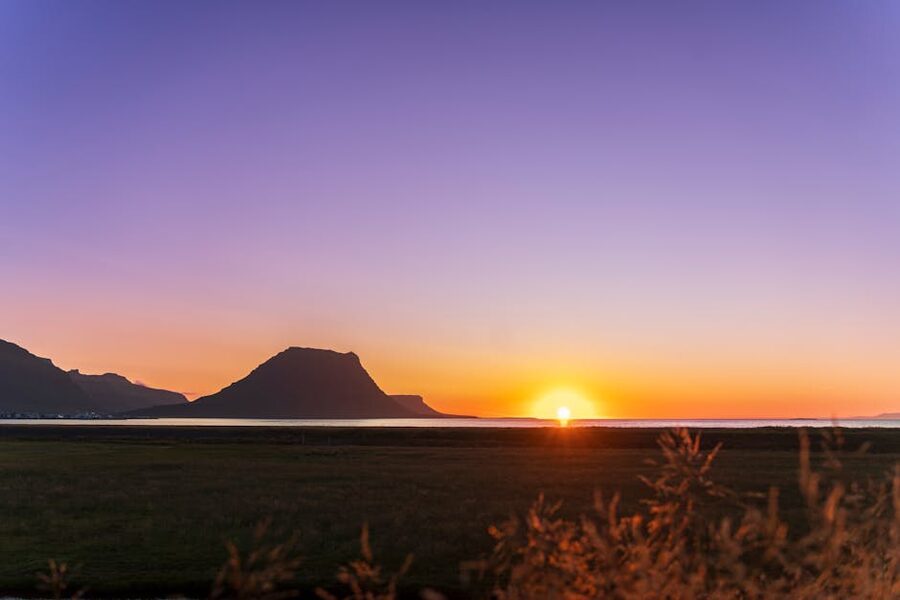
Stokksnes and Vestrahorn
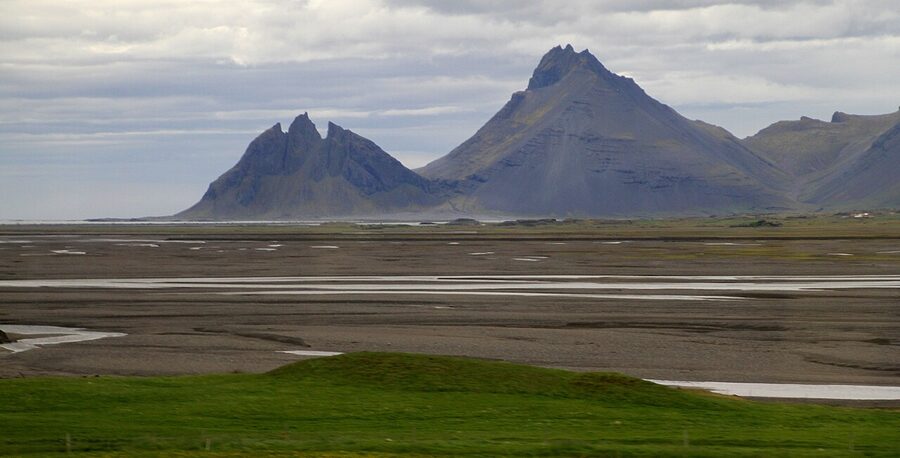
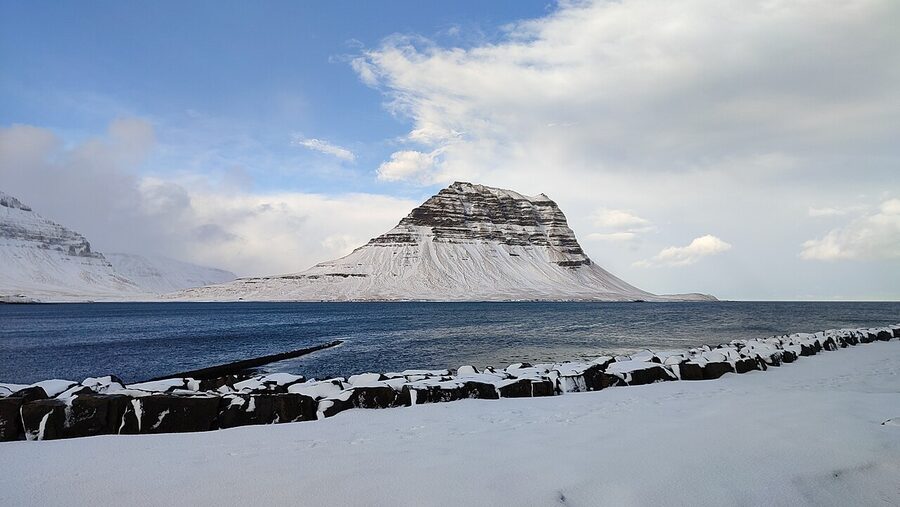
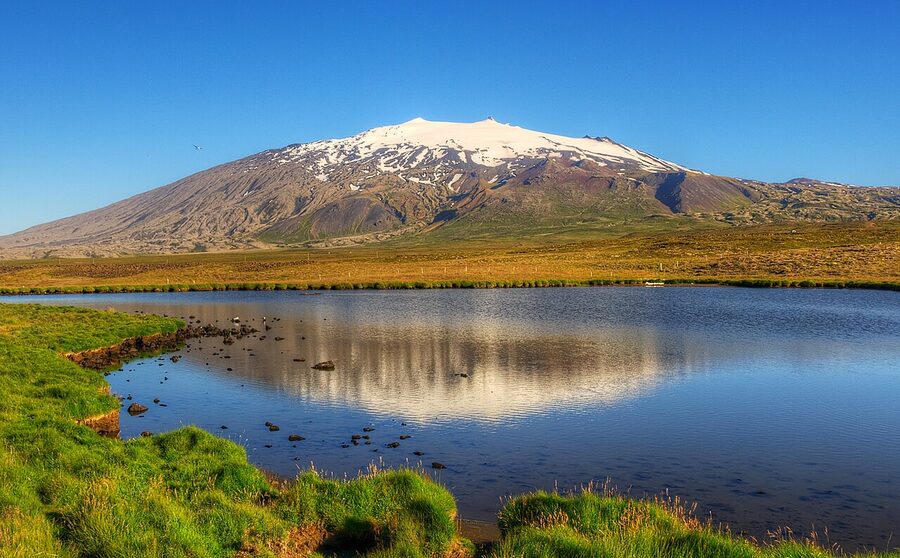
If there’s one location every photo tour stops at, it’s this one. Vestrahorn, also called Klifatindur, is a 454 m mountain on the Stokksnes headland, twenty minutes east of Höfn. The black-sand beach at its foot is a tidal lagoon at low tide, which means at certain times of day you get the mountain reflected in a perfect mirror of standing water on black sand. The compositional possibilities are absurd: black dunes in the foreground, the lagoon reflection, the mountain pyramid rising 450 m straight out of the sea, and on a good winter morning a fresh dusting of snow on the summit. It’s a paid-access site, about 1,000 ISK at the Viking Cafe at the gate, which lets you drive the headland.
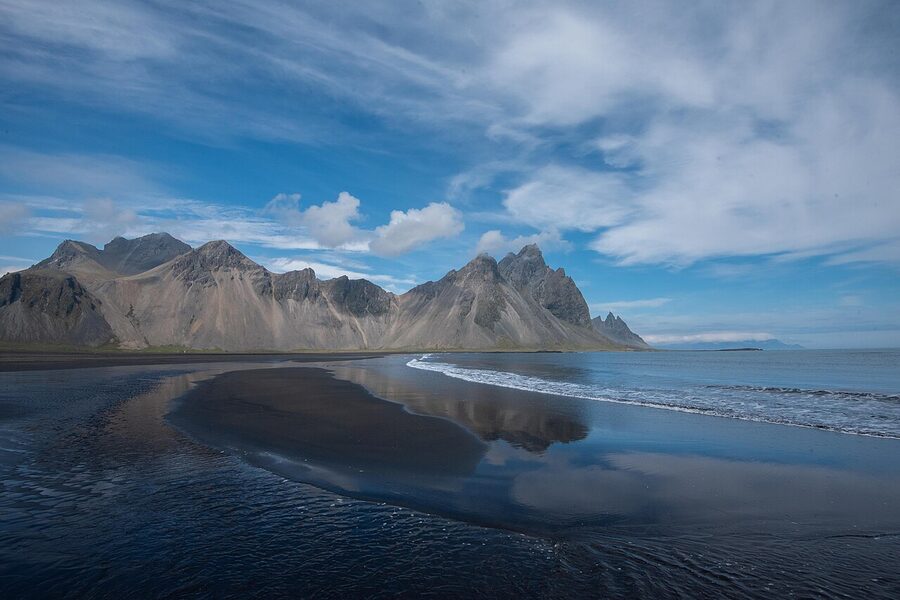
The classic shoot is sunrise or sunset in winter, when the sun lines up to backlight the mountain. Workshops time their entire South Coast itinerary around this, drive from Vík one afternoon, sleep at Höfn, shoot at dawn, breakfast, then back west. Bring a wide lens (16–35 or equivalent), a polariser to manage reflections, and waterproof boots. The cafe sells coffee and there’s a Viking film set replica on the headland which is less interesting than it looks. Skip it.
Jökulsárlón and Diamond Beach
Forty minutes west of Vestrahorn, on the same Route 1, sits the most-photographed lagoon in Iceland. Jökulsárlón (literally “glacier-river-lagoon”) is where Breiðamerkurjökull, a tongue of Vatnajökull, calves icebergs into a lagoon that drains into the Atlantic. The lagoon didn’t exist in 1934. The glacier has retreated almost three kilometres since then. What you photograph today is, technically, the result of climate change at speed, though that’s an awkward note to leave on a tour-guide article.
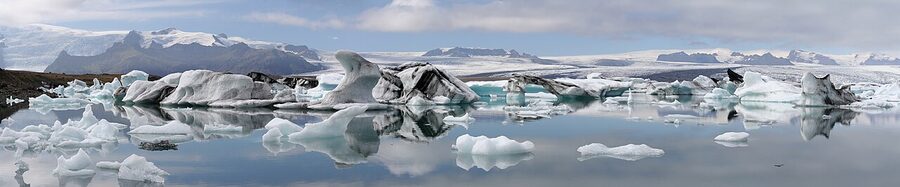
The lagoon photographs well from three angles. The east shore (where the car park is) gives you bergs in the foreground and the glacier face in the background. The road bridge across the river outflow gives you the shot looking back inland. And the west shore, accessed via a small gravel road that locals don’t advertise, gives you the cleanest reflections at sunrise. Most photo tours cover all three.
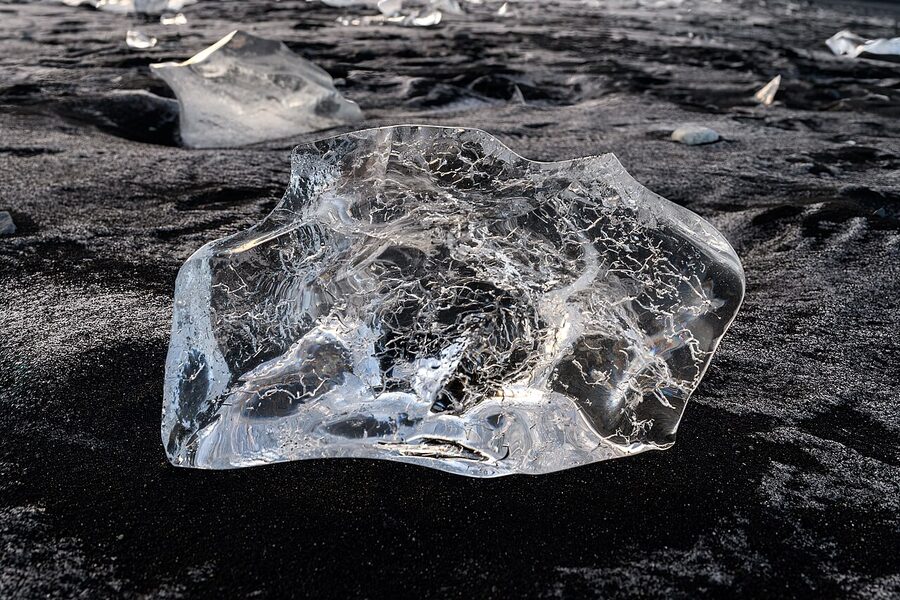
Across the road is Diamond Beach, where icebergs from the lagoon get carried out to sea and washed back up onto the black sand. You shoot ice on basalt, clear chunks the size of a microwave, sometimes bigger, scattered across a beach as if someone tipped them out of a freezer. The water is freezing and the waves come in from a long way out, so do not put your camera bag down on the sand and walk away from it. People have lost gear to a single rogue wave.
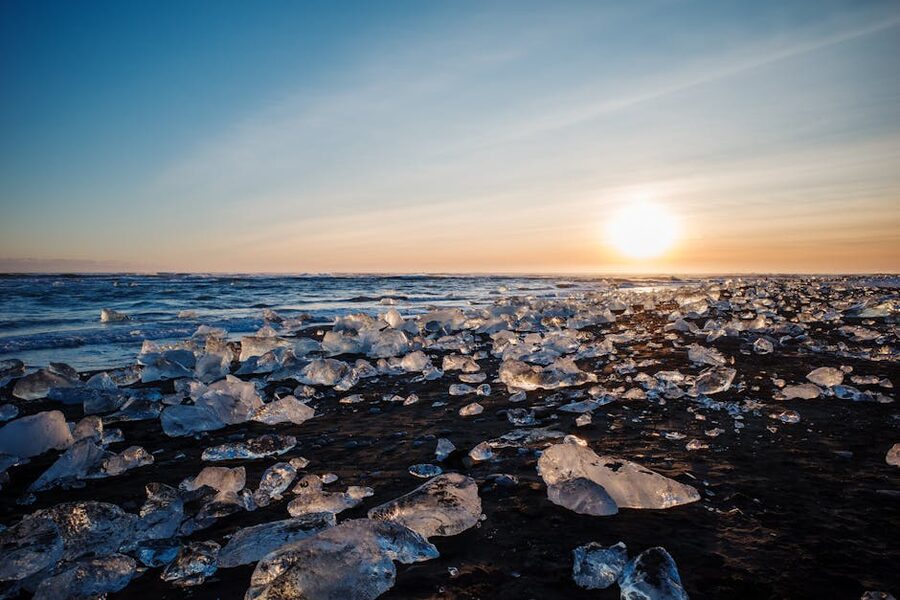
Photographically, sunrise on Diamond Beach in late February is one of the best 30-minute windows the country offers. The low sun lights the ice from behind, the wet sand acts like a mirror, and the few minutes of pink horizon before the sun crests are unrepeatable. Workshops will have you on the beach at 7:30 a.m. for a 9 a.m. sunrise. If you turn up at 11 a.m. you’ve missed it.
Kirkjufell and Kirkjufellsfoss
The mountain on the cover of every Iceland calendar. Kirkjufell (“Church Mountain”) sits on the north shore of the Snæfellsnes peninsula, and what makes it photographically extraordinary is that there’s a small three-tier waterfall, Kirkjufellsfoss, about 250 m to its east, perfectly placed to act as a foreground for a wide-angle composition with the mountain behind. The shot you’ve seen a hundred times is from this exact spot.
The mountain is small (463 m) but distinctive, a thin pyramid that rises straight out of the fjord, with a flat top that catches the snow line in winter. From October through March, when there’s snow on the summit and aurora overhead, this is where every Iceland photo tour ends up at least once. The drive from Reykjavík is two hours each way on Route 54, which means most workshops base themselves in nearby Grundarfjörður for two nights to avoid the round trip.
Skógafoss and Seljalandsfoss
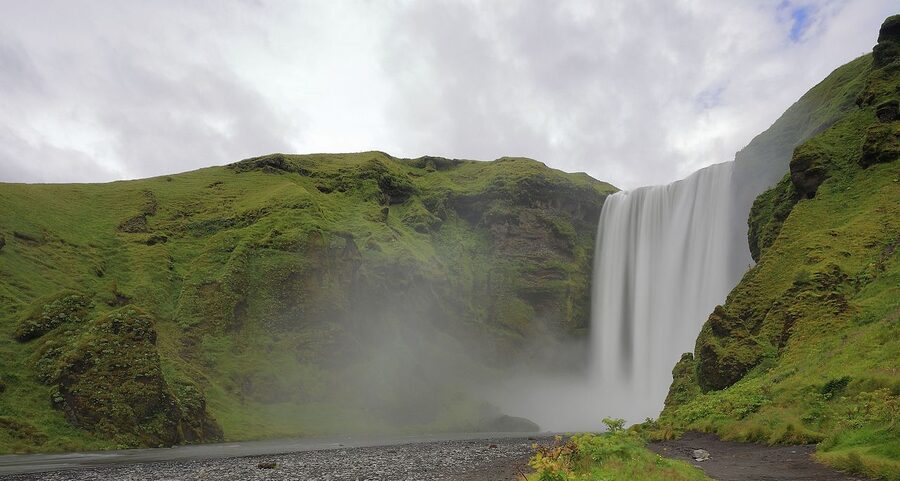
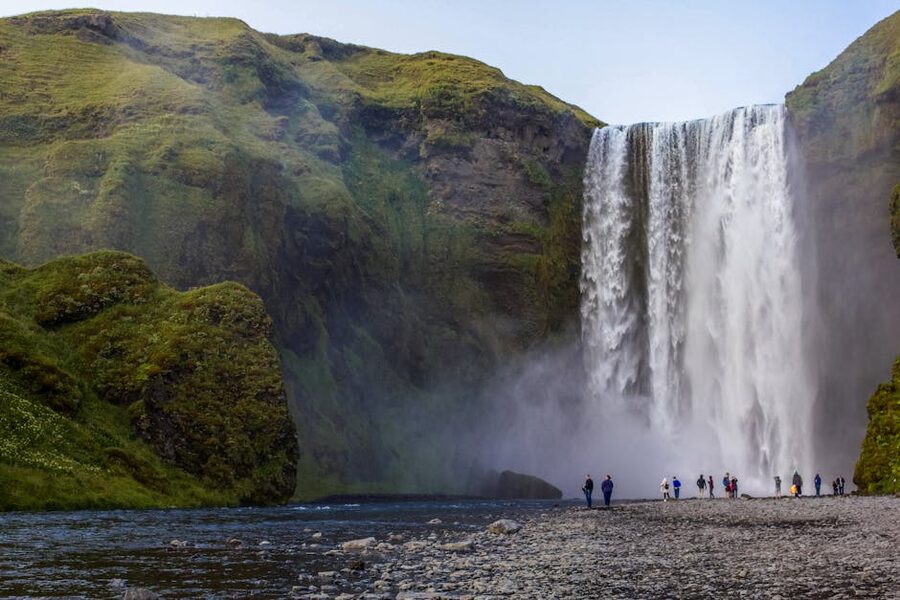
The two big South Coast waterfalls are 30 minutes apart on Route 1 and almost always paired in the same morning. Skógafoss is the wide, powerful one, 60 m drop, perfectly rectangular curtain, lots of mist. You can walk right up to the base, but you’ll get drenched. Most workshops shoot it with an ND filter for a slow shutter to smooth the water, then climb the 527 steps next to the falls for the high view. The view from the top is less photogenic than the base; skip the climb if your knees object.
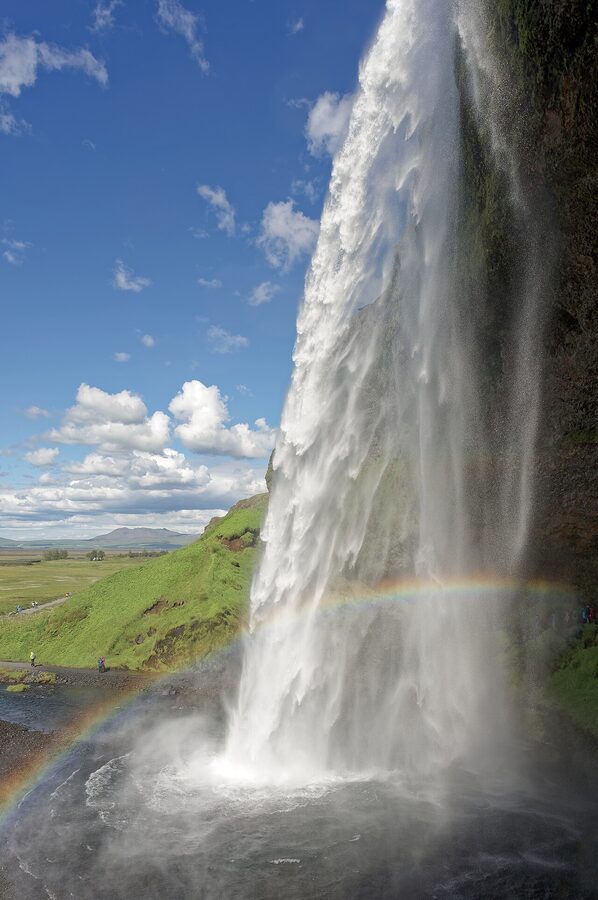
Seljalandsfoss, half an hour west on the same road, gives you something Skógafoss can’t: a path behind the curtain of water. You walk a wet rocky trail around the back of the falls and shoot back through the spray towards the road. The result is a famous backlit composition that every photographer wants and most get wrong because they don’t bring a rain cover. Sunset on a clear evening lights the inside of the curtain bronze; on most evenings you get a misted greyscale that’s still beautiful, just less Instagrammable. The path is closed in icy conditions in winter, so this is more of a summer/shoulder shot.
Reynisfjara
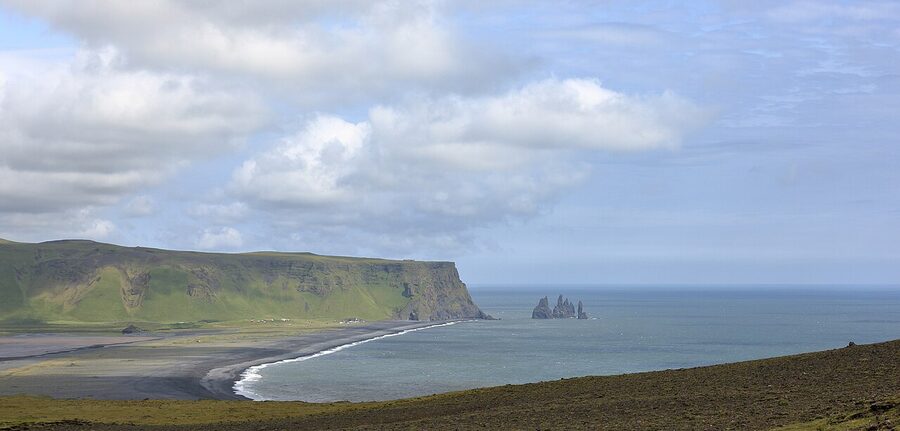
The black-sand beach at Reynisfjara, just past Vík on the South Coast, is the photographer’s beach. A wall of hexagonal basalt columns rises 12 m at its eastern end (the Hálsanefshellir cave), the Reynisdrangar sea stacks rise 66 m offshore, and the sand is a finely-graded basalt black that records every wave perfectly. It is also, very seriously, the most dangerous beach in Iceland. Sneaker waves come in from miles out with no warning and have killed several visitors. Stay back from the surf line. A wave that takes you off your feet will pull you straight out into the North Atlantic.

The shot most photo tours come for is a long-exposure looking out toward Reynisdrangar, with the surf smoothed into mist by a 30-second shutter and an ND filter. A solid tripod is non-negotiable, the wind here will move a flimsy carbon-fibre. Late winter afternoon, when the sun drops behind Dyrhólaey to your west and lights the cliffs from the side, is the best window.
Þingvellir
Most visitors photograph Þingvellir as part of the Golden Circle and never come back. Photographers who do come back find that the rift valley is best at the edges of the day. The Almannagjá fissure, the wall of the North American plate, runs north-south and catches sidelight beautifully at sunrise. The smaller Flosagjá fissure is where Silfra meets the surface; if you’ve ever wanted to photograph a swimmer between two tectonic plates, this is the spot.
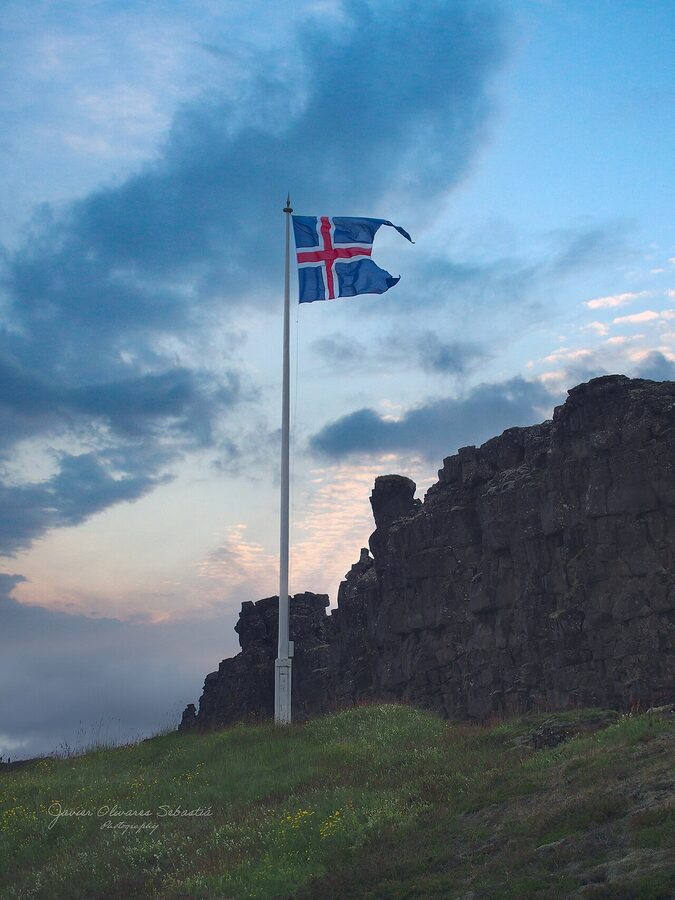
Þingvellir is also one of the closest dark-sky locations to Reykjavík for aurora, about 45 minutes east of the city, with no light pollution looking north. A clear winter night with a strong forecast and a 14 mm lens will give you the rift in the foreground and the aurora arcing over Almannagjá. I’ve taken half a dozen photographers there for exactly this shot.
The Highlands, Landmannalaugar and Kerlingarfjöll
If the South Coast is the Iceland everyone photographs, the Highlands are the Iceland the workshops drive to when they want to give you something nobody else has. Landmannalaugar (literally “the people’s pools at Landmanna”) is a geothermal area in the Fjallabak Reserve, accessible only by 4×4 in summer (mid-June to early September). The mountains here are rhyolite, high silica content, oxidised orange and yellow over centuries, and they look like a Mars landscape mixed with green moss. There’s a campsite, a small refuge hut, a hot spring you can soak in. Photo workshops typically spend 3–4 days here in July or August.
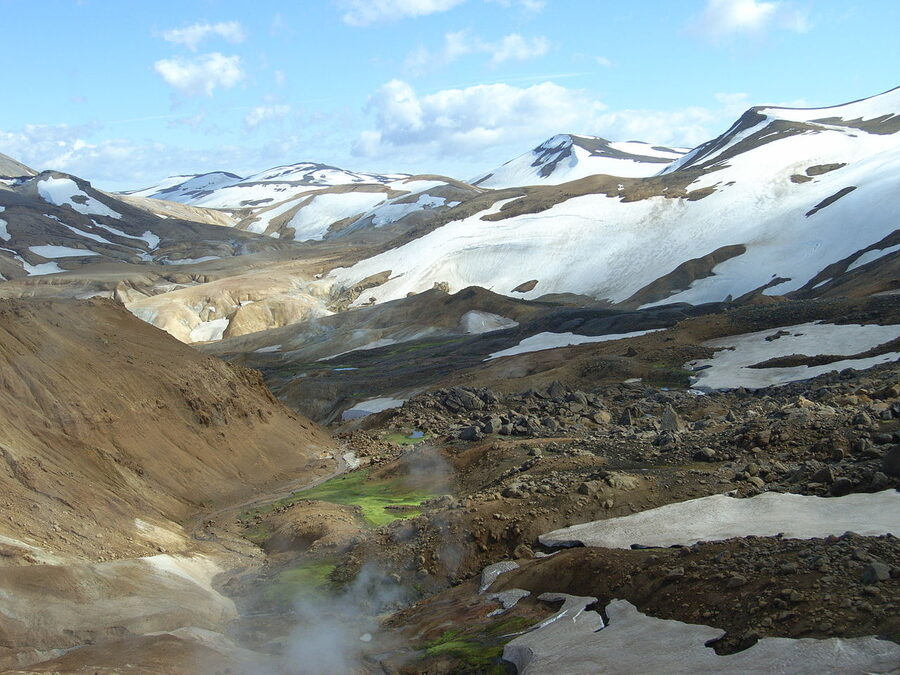
Kerlingarfjöll is the other Highlands name. It’s a mountain range of about 1,500 m peaks at the head of the Hveradalir geothermal valley, accessible from Route F35. The colours and the steam together are unphotographable in the way that anything you have to see in person to believe is unphotographable, you’ll do your best, you’ll come back with a few good frames, and you’ll know you didn’t quite catch what your eye saw. That’s the Highlands.

Húsavík and the whales
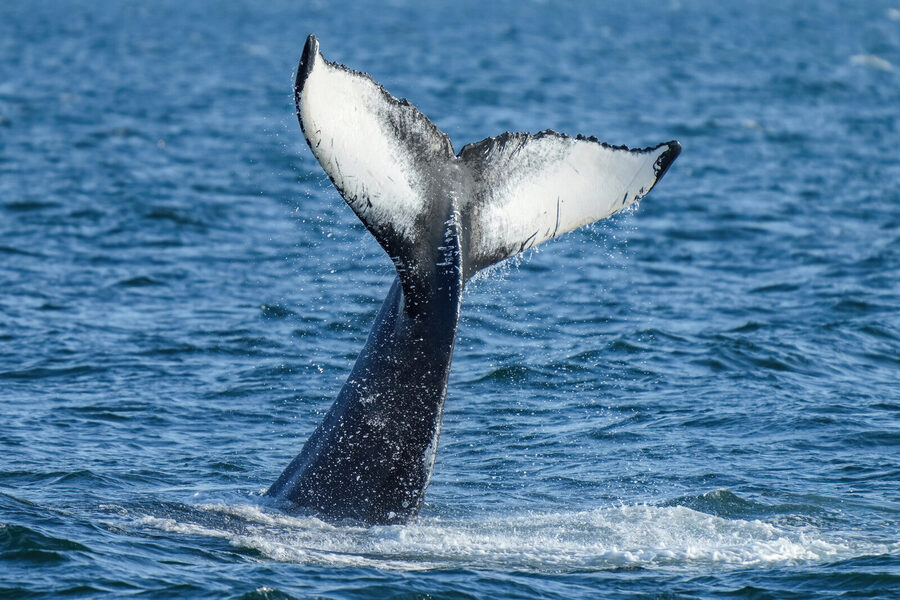
Up in the north, Húsavík calls itself the whale-watching capital of Europe and isn’t lying. Skjálfandi Bay has a year-round population of minke whales, and humpbacks, blue whales, and orcas pass through May through August. North Sailing’s morning trips have a roughly 95% sighting rate in summer and put you within 50 m of the animals. From a photography standpoint, this is one of the few wildlife shoots in Iceland where a 200–500 mm or 100–400 telephoto pays off, anything shorter and the whale is a dot.
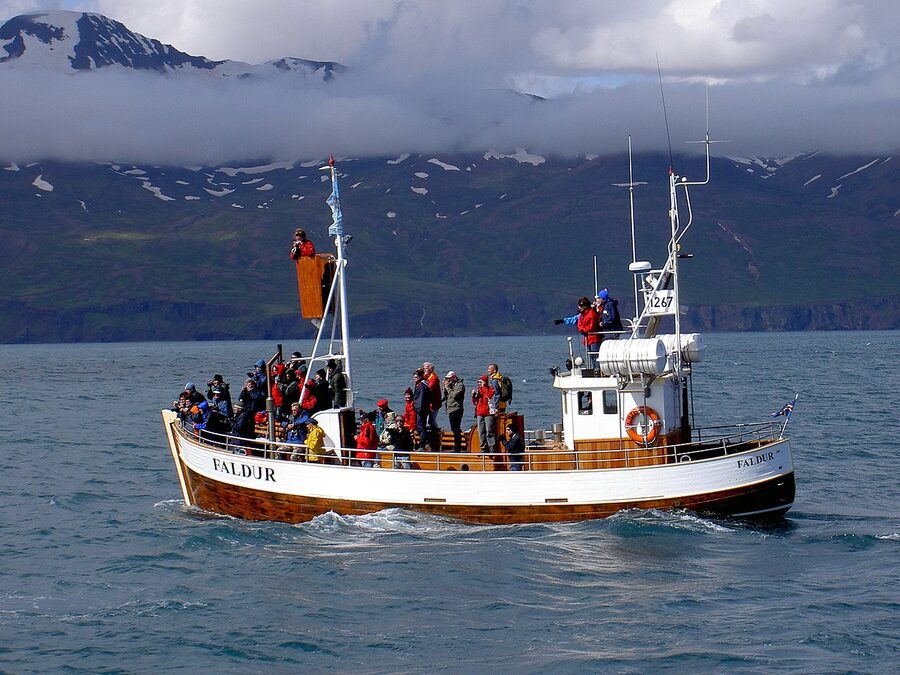
Few of the multi-day photo workshops include Húsavík because it adds a long drive to a north-loop itinerary. If whales are a priority, build your own trip around it or pick a workshop that explicitly covers North Iceland.
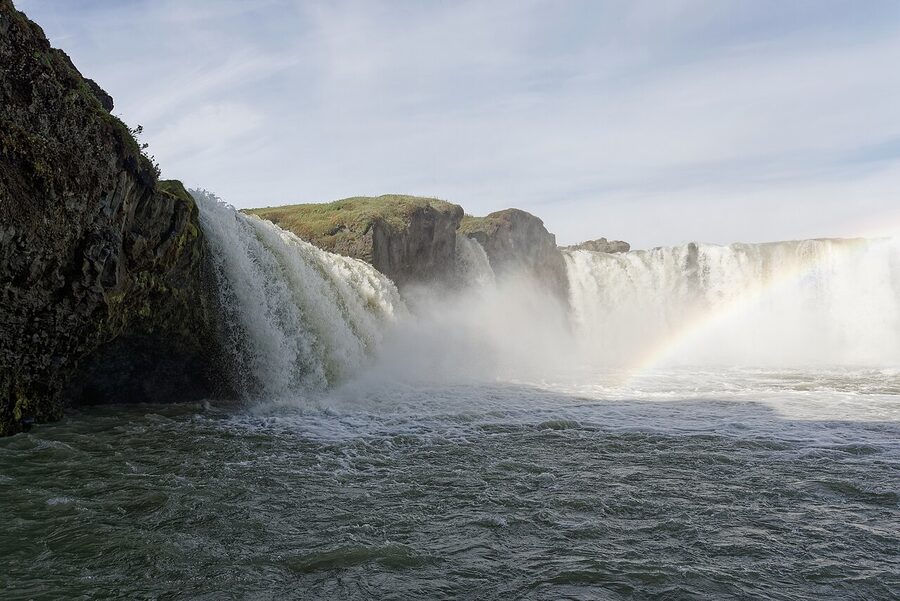
Goðafoss, Hraunfossar, Snæfellsjökull
A few honourable mentions. Goðafoss in the north is a wide horseshoe waterfall on the Diamond Circle, easier to photograph than its size suggests, because the basalt columns at its rim give you compositional anchors. The drop is only 12 m, but the width is 30, and the way the river splits around two rocks above the falls gives you a horseshoe pattern from above.
Hraunfossar in the west is the strangest waterfall in the country, water emerges from beneath a 900-year-old lava field, in a thousand small streams along a 900 m cliff face, draining into the Hvítá river. There’s no single big drop. Instead you get a wall of small cascades that photograph beautifully in autumn when the surrounding birch turns yellow. Most photo tours include this if they’re routing through Borgarfjörður.

Snæfellsjökull, the glacier-topped volcano that anchors the western tip of the Snæfellsnes peninsula, is the location Jules Verne picked for the entrance to the centre of the earth in 1864. From Reykjavík on a clear day you can see it sitting on the horizon 100 km west across Faxaflói bay. Closer up it makes a usable backdrop for foreground elements, the black church at Búðir, the basalt columns at Gerðuberg, the lava fields at Djúpalónssandur. Most photo tours spend a full day here on the Snæfellsnes loop.
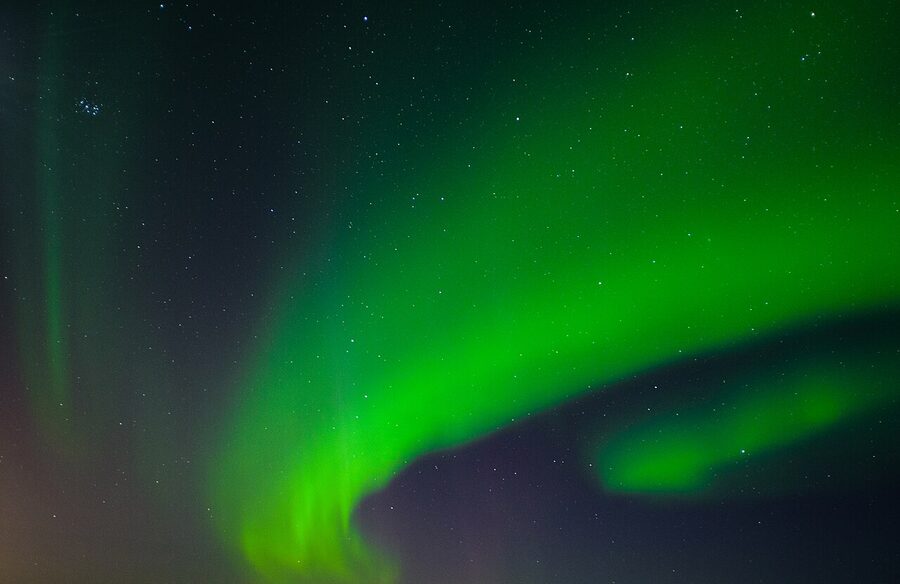
Photographing the aurora, the technical bit
This is the section every visitor wants and that most of them get wrong on the first night. The aurora is hard. Not impossibly hard, but not point-and-shoot either. Here’s the short version of what works.
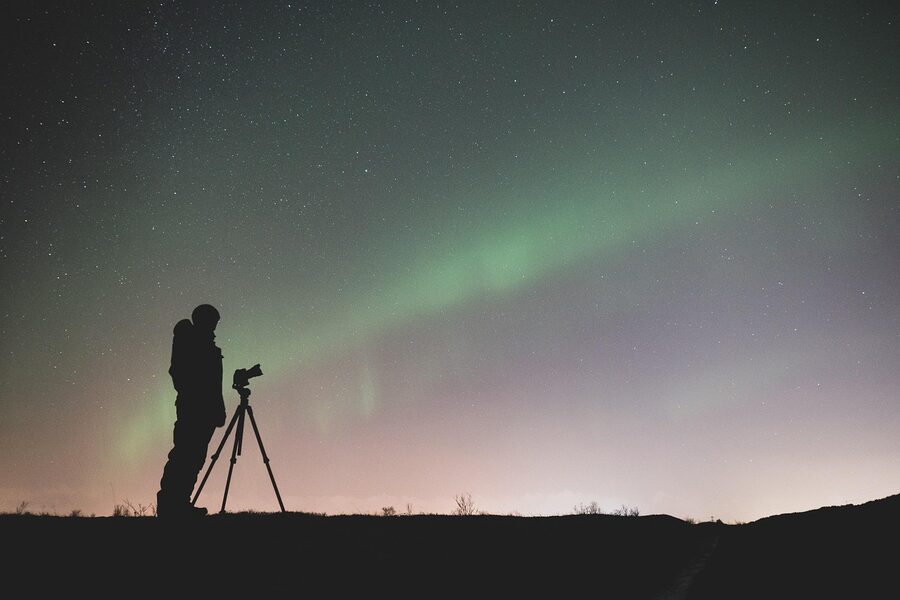
You need a tripod. Not “should bring,” but need. The exposures are too long to handhold and the wind here will move anything flimsy, so plant the legs wide and put a stone on the centre column hook if there is one. You need a fast wide lens, 14 mm to 24 mm at f/2.8 or wider. Anything narrower than f/2.8 and you’ll be pushing ISO 6400 to compensate, which most cameras do badly. You need a camera with usable high-ISO performance, anything within five years from any major brand will do. Phones won’t, despite what the night-mode advertising claims.
Settings to start at: ISO 1600, f/2.8, 8 seconds, 14 mm, manual focus set to infinity (then back the focus ring off slightly, true infinity is usually marked but not exact on most modern lenses). Take a frame. Look at it. If the lights are blurred, your shutter is too long for the aurora’s movement, drop to 4 seconds and bump ISO. If it’s underexposed, lengthen to 13 seconds (don’t go past 15, stars will trail at wider focal lengths). If the lights are blowing out, drop ISO. There is no single right exposure for the aurora because the lights themselves vary in brightness from “barely visible” to “you can read by them.”
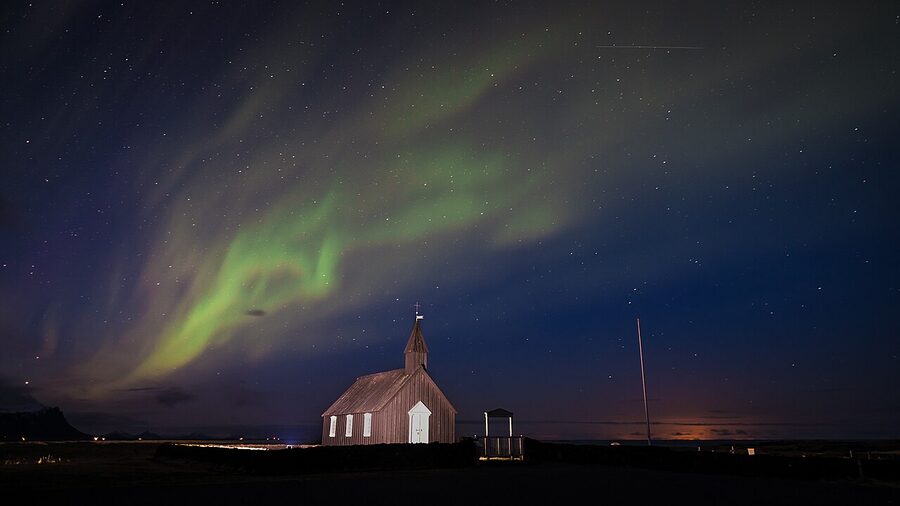
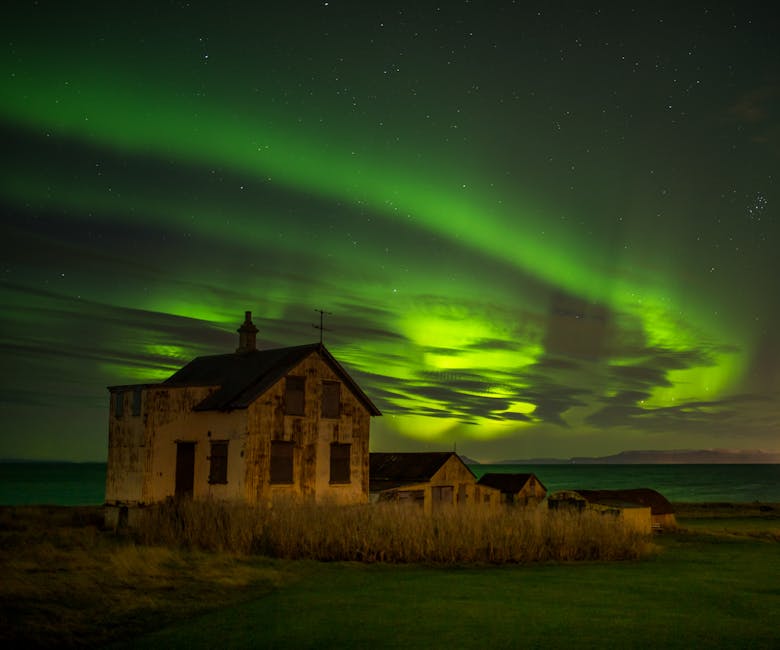
Composition is what separates the keepers. Aurora over an empty sky is forgettable. Aurora over Kirkjufell, the basalt church at Búðir, an ice-glazed lava field, an isolated farmhouse, those are the photographs people remember. The Met Office aurora forecast at en.vedur.is shows you the cloud cover map (white is clear) and the activity index from 0 to 9. Anything 3 or above with a clear patch is shootable. Anything 5 or above is the kind of night people drive across the country for. KP doesn’t tell the whole story, the Bz orientation of the solar wind matters too, but for planning purposes the simple index works.
For dark skies near Reykjavík, the best spots are Grótta lighthouse on the Seltjarnarnes peninsula (15 minutes from the city centre), Heiðmörk forest park (25 minutes south), and Þingvellir National Park (45 minutes east). For genuinely dark skies you want to drive further, anywhere east of Hvolsvöllur on Route 1, or up to Stykkishólmur on Snæfellsnes. The best aurora shots get made when you stop somewhere unplanned because the lights came on while you were driving and you found a foreground that worked.
Ice caves, the winter exclusive
Every winter, around the second week of November, the first crystal caves under Vatnajökull open for tourists. They’re meltwater tunnels that drilled through the ice the previous summer and refroze when the temperature dropped. By March they’re melting again and the season closes. There’s a roughly four-month window. If you’re booking a photo trip specifically to shoot ice caves, December and January are the safest bets, the ice is stable, the caves are at their largest, and the daylight (such as it is) lasts long enough to hike in and out without head torches.
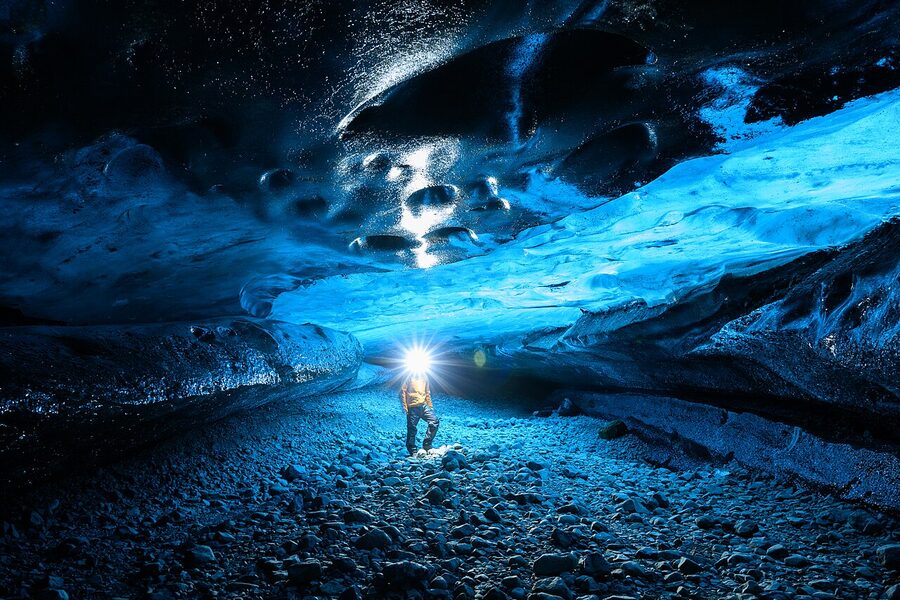
Ice caves are guided-only. Local Guide of Vatnajökull, Glacier Adventure (based in Hali), and Glacier Trips run the bulk of the trips, departing from a meeting point near Jökulsárlón. You meet a 4×4 super-jeep, drive an hour up onto the glacier on tracks the guide reads with experience, hike 10–20 minutes from the parked truck to the cave entrance, and spend roughly 45 minutes inside. Crampons and a helmet are provided. The caves are cold but not freezing, usually around -2 °C, and surprisingly bright once you’re a few metres in, because the daylight comes through the ice.
Photographically, the trick is white balance. Auto WB will neutralise the blue and give you a sad grey cave. Set white balance manually to around 4000 K to keep the blue. ISO 800 to 1600, f/4 to f/5.6, exposures of 1 to 3 seconds, you’ll need a small flexible tripod or, more often, brace against the wall. Bring a wide lens. Use a person for scale (your guide is fine; they’re used to it). Keep your gear out of the snow on the way in, wet electronics in cold air is the standard cause of broken cameras on these trips. Most workshops include a “blue ice and ice cave” day in their winter Iceland itinerary; private trips run around 35,000–55,000 ISK per person from Hali.
The operators worth your money
This is where the photo-tour world gets confusing because everyone calls themselves a workshop. The real split is between local Icelandic operators who run year-round and international photographers who fly in for one or two trips per season. Both can be excellent. The difference is mostly accountability, a local operator with a Reykjavík office is easier to chase if something goes wrong than a guest workshop run by a photographer based in Australia.
The biggest local operator is Iceland Photo Tours, based on Lækjargata in central Reykjavík. They run multi-day workshops year-round (4-day winter, 8-day aurora & ice caves, 10- and 14-day ring-road, plus summer Highlands trips) led by Iurie Belegurschi and a stable of guest photographers. Group sizes are 8 to 10. Pricing starts around 2,500 EUR for shorter trips and runs to about 6,000 EUR for the two-week ring road. Their booking page is busier than anyone else’s in the SERPs because the website is genuinely good at converting; the workshops themselves get consistently strong reviews on TripAdvisor.
Arctic Exposure, also Reykjavík-based, is the smaller competitor. Their schedule is densely populated, the published 2026 calendar runs from a Faroe Islands trip in May through to a Lofoten workshop the following February, with about 25 dates in between. They specialise in landscape and drone work and cap groups at 6 to 8. Typical 8-day winter workshops sit around 3,800 to 4,500 EUR. They’re the operator I’d recommend to a photographer who wants serious instruction in a small group.
Iceland Aurora Photo Tours (different from Iceland Photo Tours, despite the similar name) is run by Jónína and David and focuses specifically on aurora workshops in winter. Smaller scale, longer track record, and they understand the unpredictability, if the forecast is bad they reschedule the night, not the trip.
For international guest photographers, the standouts running 2026 trips include Mads Peter Iversen (Danish landscape photographer with twice-yearly Iceland workshops), Daniel Kordan, Erin Babnik, and Andrea Livieri (whose trip reports from Highland workshops read like a masterclass, see his blog if you want a sense of what a serious workshop looks like in practice). These run through partner operators on the ground, which means logistics are handled by an Icelandic company while the instruction comes from the guest. This is usually the best of both worlds. Prices for these guest-led workshops typically sit around 4,500 to 6,500 EUR for a week, sometimes more.
For private guides, one photographer or a couple, in a single 4×4 with a guide-driver, Thor Photography (Thor is Reykjavík-based, runs solo or two-person photo days year-round) is a known name. Hidden Iceland and Iceland Unlimited both have private photo-day desks and will assemble a custom trip around your interest. Private days run 90,000 to 200,000 ISK per day depending on vehicle and distance.
The thing not to do, and I’ve seen this go badly for visitors, is book a “photography tour” that turns out to be a regular sightseeing tour with the word “photography” in the title. Check the participant cap. Check the lead photographer’s portfolio. If neither is published, it isn’t a photography workshop. It’s a coach trip with a marketing budget.
Self-drive vs guided, when each is right
Plenty of visitors photograph Iceland without booking a workshop at all. A self-drive trip with a rental car, a few weeks of research, and the willingness to chase your own light can produce work as good as any guided trip. The trade-off is time. You’ll spend half your hours navigating, second-guessing the forecast, and arriving at locations after the light has already gone.
Self-drive wins when you have at least 10 days, you’re already a confident landscape photographer who knows what you want, and you’re prepared to drive in conditions that would close a road in most countries. A guided tour or workshop wins when you have less than 10 days, you want instruction as part of the trip, you don’t want to drive on ice or sleep in a 4×4, or you specifically want access to locations that need a super-jeep (Þórsmörk, Askja, the deep Highlands).
The hybrid I usually recommend to visitors with a photographic bent: rent a small 4×4 and drive the South Coast yourself for 3–4 days, then book a 2-day private photo guide for the Highlands or a winter ice-cave day. You get the freedom of the self-drive for the easy half and the access of the guide for the part that’s genuinely difficult. This works in summer or winter; in winter, the self-drive section needs studded tyres and a willingness to turn back if Route 1 closes east of Vík.
What it actually costs
Roughly, in 2026 prices:
- Half-day photo tour from Reykjavík: 25,000–45,000 ISK per person, group of 4–6. Suitable as an add-on to a normal Iceland trip.
- Full-day private photo guide: 90,000–200,000 ISK depending on vehicle. Splits well between two photographers.
- 3-day private photo tour: 450,000–600,000 ISK total, vehicle and guide-driver included, accommodation usually extra.
- Group multi-day workshop, 5 days, local lead: 2,200–3,200 EUR, accommodation included, group of 8–10.
- Group multi-day workshop, 8–10 days, local lead: 3,800–5,500 EUR.
- Workshop with international guest photographer, 7–10 days: 4,500–6,500 EUR.
- Two-week ring road workshop: 5,500–7,500 EUR.
- Ice cave day-trip add-on: 35,000–55,000 ISK per person from Hali or Jökulsárlón.
Things that aren’t included in most workshop prices: international flights, alcohol, lunches, single-room supplements, optional helicopter add-ons. Things that usually are: ground transport, breakfast and dinner, accommodation, instruction, and access fees to private sites like Stokksnes.
For self-drive comparison: a small 4×4 rental in winter runs around 14,000 to 22,000 ISK per day plus fuel, accommodation along the South Coast averages 25,000 to 40,000 ISK per night for a basic double, and you’ll spend 4,000 to 8,000 ISK per day on food and coffees. A 10-day self-drive winter trip for two photographers comes out around 800,000 to 1,200,000 ISK total, which is roughly half the cost of two workshop spots. The catch is you do all the planning.
Gear, what actually matters here
This isn’t a gear blog and I’m not about to recommend a specific lens. But there are a few things about Iceland in particular that affect what you bring.
Tripod: bring one. The exposures you’ll need for waterfalls (1–4 seconds with an ND), aurora (4–15 seconds), and ice caves (1–3 seconds) all require it. A travel tripod that compresses to backpack length is fine; carbon fibre over aluminium for cold-weather handling. A weight hook on the centre column for stones at coastal sites is genuinely useful.
Weather sealing matters here. You will get rained on. You will get snowed on. You will be in salt spray at Reynisfjara and waterfall mist at Skógafoss. A weather-sealed body and at least one weather-sealed lens earn their cost back in the first week. Pack two microfibre cloths and a rain cover (a shower cap from a hotel works in a pinch).
Filters: a circular polariser for waterfalls and reflections (cuts the highlight on wet rock and brings out the rainbow at Skógafoss); a 6-stop ND filter for long-exposure water work; that’s plenty. Graduated NDs are mostly outdated now that bracketing is so easy in software.
Lenses: wide (14–24 mm or equivalent) for aurora, ice caves, and big landscapes; a standard zoom (24–70 or 24–105) for everything else; a telephoto (70–200 minimum, longer for whales or puffins from a distance) if you have room. Three lenses is the right number for a two-week trip. Five is too many; you won’t change lenses outdoors in driving rain anyway.
Spare batteries. Cold drains them. Two backup batteries minimum, kept in an inside jacket pocket against your body. The cold doesn’t permanently damage them, they recover when warm, but a frozen battery will give you a “low battery” warning at exactly the moment the aurora explodes overhead.
What you don’t need: a drone is technically allowed in many places but restricted in others (Vatnajökull National Park bans them entirely without permit, Reynisfjara doesn’t allow them, and tour operators will ask you to put yours away near other groups). A flash is dead weight for landscape work. A 600 mm prime is overkill for puffins (they’re close) and barely long enough for whales (you want zoom).
The dark side, weather kills schedules
This is the part nobody mentions in the marketing. Iceland’s weather rewrites itineraries. Even photo workshops with a known route will skip a day, swap a morning, or turn around halfway down Route 1 because the wind is hitting 35 m/s and the road authority has closed it. This happens to perhaps one day in every ten of winter trips, and one in twenty of summer trips. You build the slack into the schedule or you lose the shot.
The good operators handle this well. They’ll leave the morning route open until they see the 5 a.m. forecast. They’ll route through Reykjanes if the South Coast is shut. They’ll add an afternoon ice-cave booking if the morning is washed out. The bad ones stick to the original itinerary and you spend the day on a coach watching rain on the windows. When you book, ask the operator what their flex policy is. The good answer is something like “we look at the forecast each evening and adapt.” The bad answer is “we’ll do the itinerary as published.”
The other thing weather does is collapse the famous shots. Vestrahorn in flat grey light is just a mountain. Kirkjufell with no aurora, no snow, and overcast sky is photographically bland. You can do everything right and still come back without the keepers because the four mornings you were at the location were the four worst mornings of the month. This is genuinely possible and it’s why workshop reviews can be wildly inconsistent, the same operator with the same itinerary can produce a stunning trip and a disappointing one in the same season, depending on weather. Þetta reddast, it’ll work out, but accept that “working out” sometimes means coming home with a different set of photos than the ones you planned.
How I’d plan it
If a friend with a camera asked me where to start, I’d say this. Pick the season first. If the aurora and ice caves are why you’re coming, book a winter workshop, late November through February, 7 to 10 days, with a known operator like Arctic Exposure or Iceland Photo Tours. If the Highlands or the puffins are why you’re coming, book a July or August workshop. If you want both, do two trips. If you want flexibility and you’re already a confident photographer, do a hybrid, three days self-drive on the South Coast, two days with a private photo guide for the bits that need a 4×4 or a glacier permit. If you only have a long weekend, take a half-day photo tour out of Reykjavík to see if you like it before committing to a full workshop next year.
Book early. The good photographers’ winter trips sell their 2026 dates out by mid-2025 and the same will be true for 2027. Check the participant cap. Read the trip report on the photographer’s blog before you commit. Bring a tripod. Build in slack for weather. And don’t bring a 600 mm; the puffins are closer than you think.
The pictures from a good Iceland trip will sit in your hard drive for a decade. Some of them you’ll print. Some of them you’ll send to people who weren’t there and watch them not quite believe what you’re showing them. That’s the part the brochures get right. We have, by accident of geology and accident of latitude, one of the most photographable countries on the planet. Bring the right gear, take the right tour, and stand in the cold a little longer than feels reasonable. The photos earn the wait.
For more on Iceland tour options that often pair well with photography days, see our walkthroughs of fire and ice tours, glaciers and geysers tours, customized Iceland tours for fully bespoke trips, and the December Iceland guide for context on what winter actually looks like here. Or browse the full tour guides hub.