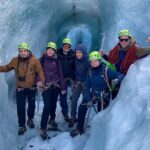
Ice climbing in Iceland is no joke.
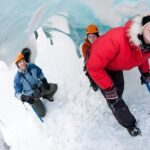
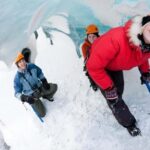
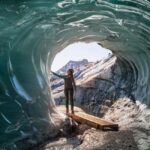
This Skaftafell outing gets you onto Falljökull, an outlet glacier from Vatnajökull, where you’ll walk, learn, and then climb ice with proper safety systems. I love that the guides teach you how to move on ice (not just how to pose), and I love the small group size, capped at 6, so the pace stays human.
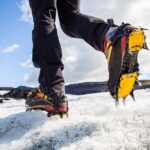
What really makes this tour special is the combination of big glacier scenery and hands-on technique. You’ll spend about three hours on the ice while your guide keeps scouting safer routes through crevasses and moulins, and you’ll use gear like crampons, ice axes, harnesses, helmets, and ropes. The one drawback to think about: this is not a casual stroll. It’s physically demanding, and it isn’t suitable for children under 12.
In This Review
- Quick take: what you’ll remember most
- Skaftafell’s Falljökull climb: what makes this worth your time
- The 4-hour rhythm: safety first, then crampons, then the wall
- What “ice climbing” really means on Falljökull
- Gear and comfort: what’s provided, and what you must bring
- Small group energy: why max 6 participants matters
- The guides and the teaching style you can expect
- Timing and transport: coach rides that don’t kill the day
- Price and value: what $259 buys you in the real world
- Who should book this Falljökull hike and climb?
- Booking call: should you book this tour?
- FAQ
- How long is the Falljökull ice climb and hike?
- How many people are in the group?
- What gear is included?
- What should I bring with me?
- Is the tour suitable for kids?
- What language is the guide?
Quick take: what you’ll remember most
- Falljökull + Vatnajökull views: Iceland’s ice-covered peaks can be over 2,000 meters above you.
- Real climbing mechanics: you practice crampons and ice tools, not just walk on the surface.
- Guides who manage risk: your guide scouts constantly around shifting crevasses and moulins.
- A short, scenic transfer: quick bus time, then a walk to the ice edge before you start climbing.
- Small-group attention: up to 6 participants means more guidance when you need it.
Skaftafell’s Falljökull climb: what makes this worth your time
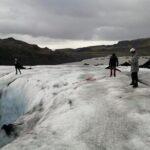
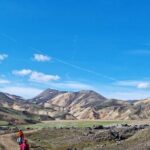
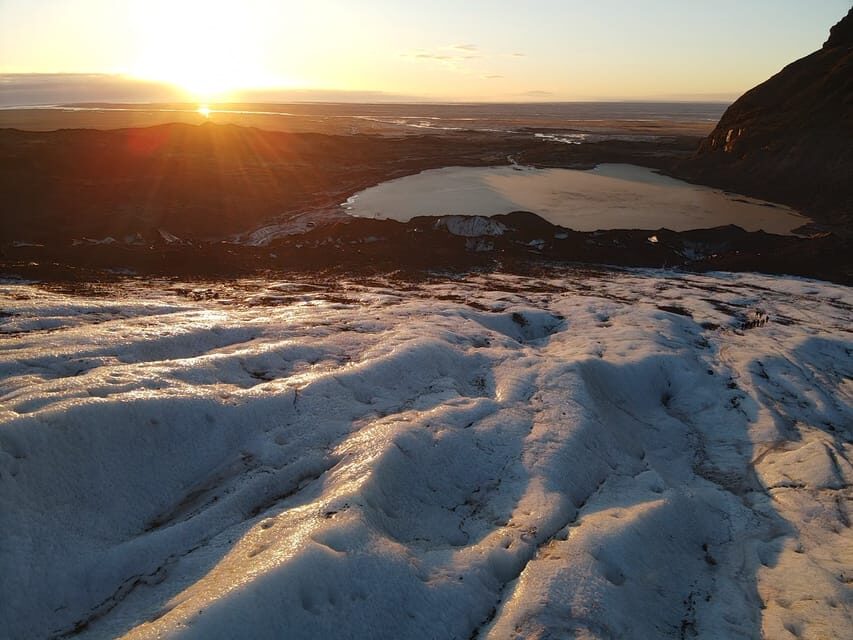
There are “photo glacier” days in Iceland, and then there are days where you actually work the ice. This is the second type—part hike, part technique lesson, part climbing session on Falljökull, one of the outlet glaciers that feeds from Europe’s largest ice cap.
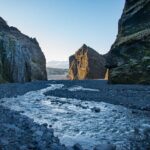
The setting is pure Skaftafell magic: you’re in Vatnajökull National Park, with ice giants towering above you. Even the walking isn’t just warm-up. You’re encouraged to notice the glacier’s structure—crevasses, fissures, and moulins (those vertical shafts where meltwater sinks into cracks).
The real win is how the tour balances wonder with structure. You’re not thrown into chaos. You’re taught how to move safely, how to use your gear, and how to trust the process while your guide manages the glacier’s constant motion.
You can also read our reviews of more hiking tours in Vik
The 4-hour rhythm: safety first, then crampons, then the wall
Even though the tour runs about four hours total, it doesn’t feel rushed. It’s built like a workshop: you get a safety foundation, then you transition from walking to climbing.
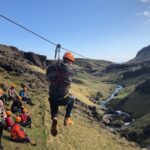
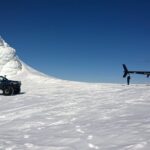
You start at Tröll Expeditions Skaftafell in Hof. From there, you take a coach transfer for about 30 minutes. That travel time matters because it positions you for the glacier area and gives the team room to run a proper start before you step onto ice.
Next comes a safety briefing (about 30 minutes). This is where you learn the rules of the day—how you’ll move in boots and crampons, how roped climbing works, and what to listen for from your guide. It’s also when you get oriented to the gear and the idea that glacier routes can change fast.
After that, you’ll spend time at Skaftafell on guided hiking and instruction (about one hour). Think of this as your practical warm-up: pace, footing, and how you’ll behave on uneven ground before you commit to the ice.
You then get a second block that mixes hiking and a bit of class-style instruction and safety (about another hour). This is the part that makes a first-time ice climber feel less like a stunt performer and more like a student. If you’ve never worn crampons, you’ll be glad they don’t skip the basics.
When it’s time to reach the ice, you’ll do a shorter walk from the glacier parking area to the edge (about 15 minutes, after a quick transfer that’s roughly ten minutes). At the edge, your guide demonstrates how to put on crampons—the kind of detail that saves trips, nerves, and wasted energy.
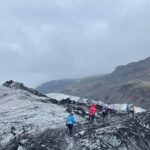
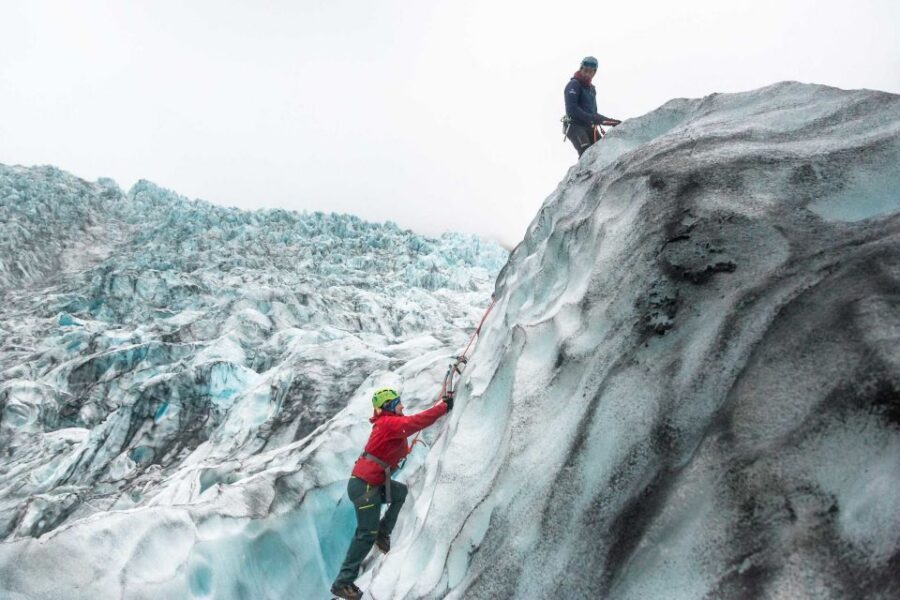
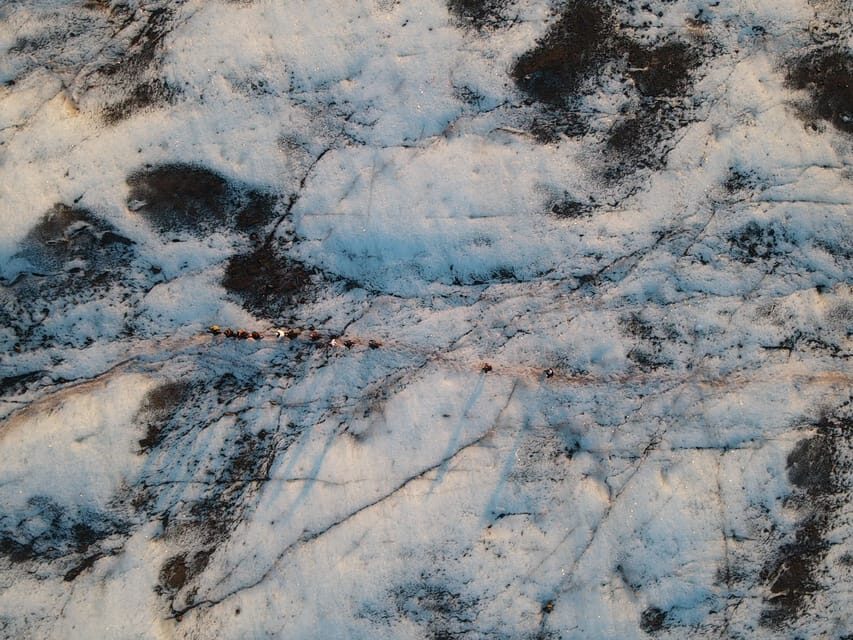
Then you’re on the glacier for around three hours, including time to observe ice formations and your climbing session. Because the glacier is unstable and shifting, your guide keeps scouting for safer crevasses and possible routes, so you’re not stuck doing the same exact line every time.
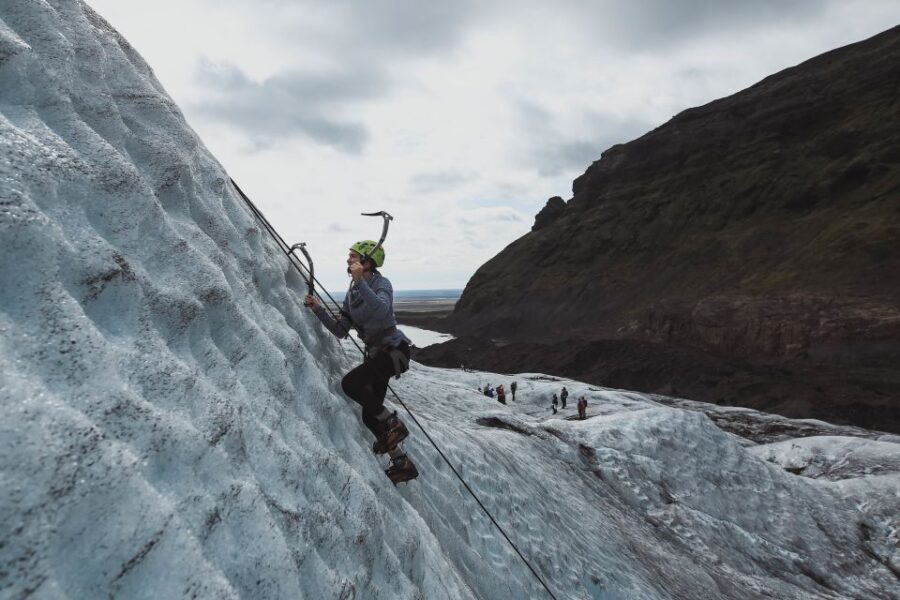
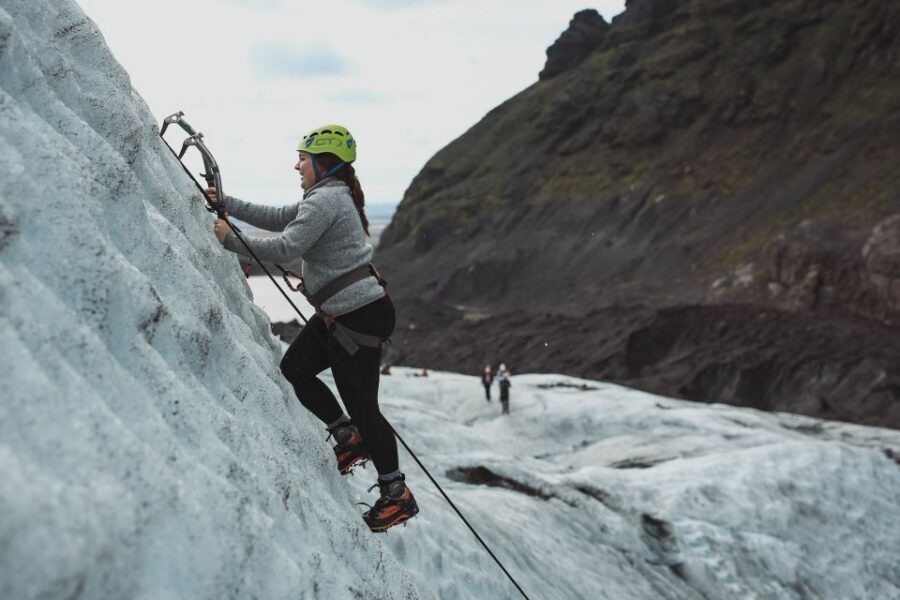
What “ice climbing” really means on Falljökull
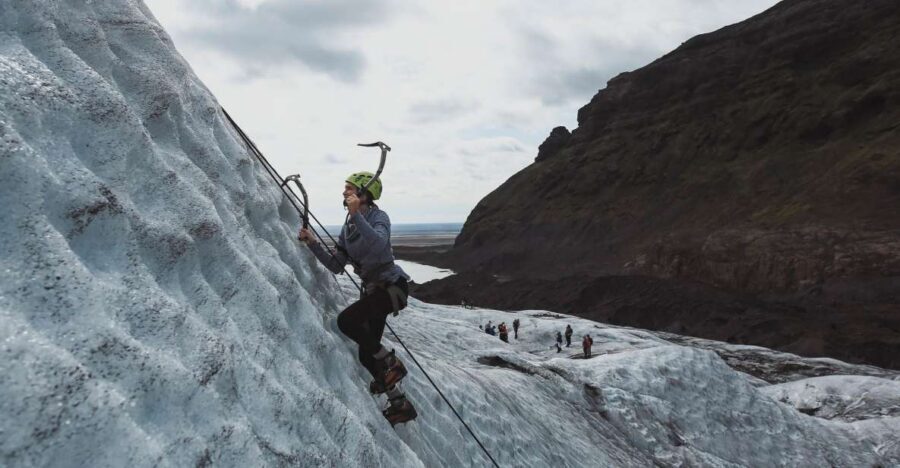
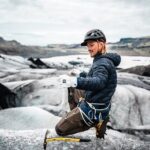
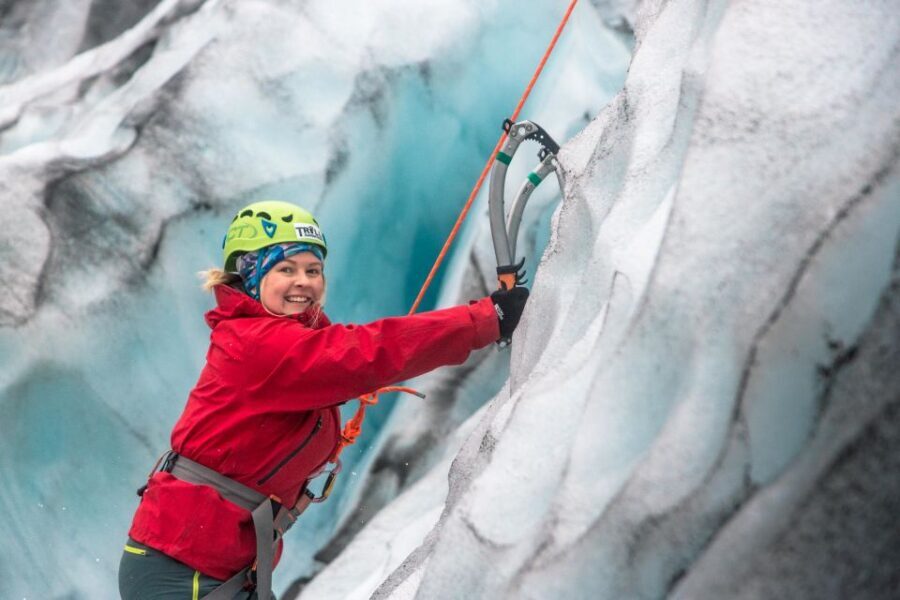
When people hear ice climbing, they picture a dramatic wall and a few brave moves. Here, it’s more instructional than you might expect. You’ll go up ice using crampons and an ice axe, but you also learn movement habits that help you stay balanced on slippery, changing surfaces.
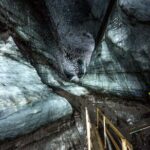
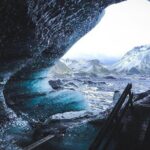
Your guide uses a clear safety system before any ascent or descent. They may use a large ice screw and attach a safety line, then manage the ropes so you can climb or rappel into a crevasse and climb out again. That sounds intense, and it is—but the process is methodical.
One subtle but important thing: the glacier environment determines the route. Your guide will frequently scout out new crevasses or moulins for the climbing session. That’s not “added excitement.” It’s how you avoid dangerous conditions and overcrowded lines in a dynamic place.
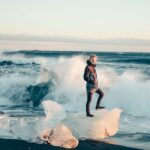
Between climbing moves, you’ll hike on the ice to see formations up close. The tour includes time to look at crevasses and deep fissures, and you might even spot the striking blue tones people talk about. The guide may point out tiny ice tunnels and watch for the “blue heart” effect that’s often possible in winter conditions.
Gear and comfort: what’s provided, and what you must bring
This is one of the better-value parts of the tour. You’re not paying $259 just for the view. You’re paying for the guide expertise and the safety gear setup.
Included gear covers the essentials: hiking boots, crampons, ice axe, harness, helmet, and ropes. You’ll also get coffee and chocolates, which sounds simple until you’re standing on cold ice thinking about how you’ll keep warm.
What’s not included is gloves and rain gear. So don’t count on being comfortable if the weather flips. Even if you start in decent conditions, Iceland can change fast.
Here’s what I’d bring based on what the tour requires:
- Warm layers that work under a harness and helmet
- A hat
- Gloves (since they aren’t included)
- Rain gear, just in case
If you hate being cold, this matters more than you think. Your hands and feet decide how much you can focus on technique.
Small group energy: why max 6 participants matters
Ice climbing is safer and easier when the group isn’t crowded. With this tour, you’re limited to 6 participants, which makes the guiding style more personal.
In past sessions with guides like Lily, the group experience has been described as calm and instruction-heavy, with the tour feeling doable even for first-timers. Other guides mentioned—like Jan—have been called very experienced and able to teach with confidence (though one person noted that guide tone can vary). Translation for you: show up ready to listen, and you’ll get the best version of the experience regardless of personality style.
The small group also helps with pacing. Glacier routes aren’t endless. A guide can only manage so many people at once on ropes and in narrow ice spaces. Fewer participants means more attention when you step into crampons or when you’re figuring out how hard to plant the ice axe.


The guides and the teaching style you can expect
This is a guided adventure, and the guide is the difference between frightening and fun. The tour is run by certified glacier guides, and the vibe you want is calm, clear, and focused on safety.
In guide feedback from real departures, Vincenzo was specifically praised for being skilled and informative, and for explaining both the glacier wonder and the climbing logic behind it. Diego and Benat were also mentioned as strong guides, with people calling the climb a highlight.
One guide name that stands out in feedback is Adam, who teamed up with Diego. Another is Lily, who’s associated with a very positive learning experience—great weather, great views, and a route that felt manageable for beginners.
So what does this mean for you practically? Pick a day you can show up alert and ready to learn. Your guide can only do so much if you’re distracted, cold, or rushing through instructions.
Timing and transport: coach rides that don’t kill the day
The tour is about four hours end to end, which is handy when you’re doing a road-trip around Iceland’s south coast and want a high-impact activity without a full-day commitment.
You’ll have two coach/transfer blocks:
- one roughly 30 minutes at the start
- one roughly 30 minutes at the end
Then there’s the shorter glacier-area transfer and walk: about ten minutes on a bus to the parking lot, then around 15 minutes on foot to the ice edge.
This flow keeps your time on actual ice meaningful. You’re not stuck sitting around for hours, and you’re not sprinting from one viewpoint to another. It’s a focused, activity-first structure.
Price and value: what $259 buys you in the real world
At $259 per person, this isn’t a cheap thrill. But it’s also not an inflated price for a single photo moment.
Here’s what you’re paying for:
- a certified glacier guide
- specialized safety gear (helmets, harnesses, crampons, ropes, ice axes)
- a small group capped at 6
- roughly three hours actually on the glacier
- coffee and chocolates
The hidden cost in most DIY versions of this kind of experience is gear, instruction, and risk management. Here, the tour operator handles the gear and guides so you’re not trying to invent glacier technique on your own. You also get the guide’s glacier knowledge, including how routes may change due to shifting crevasses and moulins.
So if you want the confidence-building version of ice climbing—one where you learn the basics and still do a real climb—this pricing starts to make sense.
Who should book this Falljökull hike and climb?
This tour fits best if you:
- want a once-in-a-lifetime glacier experience but still want instruction
- like active days more than bus-and-viewpoint days
- are comfortable with cold and don’t mind a physically demanding session
- want a small group for safety and attention
It may not fit if:
- you’re looking for something easy and low effort
- you’re traveling with kids under 12 (this is not suitable)
- you’re not willing to bring gloves and rain protection
If you’re a complete beginner, you’re not automatically out. The tour is designed so first-time climbers can manage the route when they follow guidance and use the gear properly.
Booking call: should you book this tour?
Yes, if you want to do more than stand near a glacier. I’d book it if ice climbing is high on your Iceland list and you’d like a structured, safety-first way to try it.
I’d pause before booking if cold-weather clothing is a headache for you. You’ll be on ice for hours, and gloves/rain gear aren’t included, so plan ahead.
One more practical tip: double-check your meeting point information before you leave. Some people have run into issues when the meeting point seemed different from what they expected. If you might arrive without internet access, make sure you’ve confirmed the address ahead of time.
If your goal is a hands-on Glacier 101 that ends with real climbing moments on Falljökull, this is a strong choice.
FAQ
How long is the Falljökull ice climb and hike?
The tour lasts about 4 hours.
How many people are in the group?
This is a small group, limited to 6 participants.
What gear is included?
You get glacier equipment including a helmet, harness, crampons, ice axe, and ropes, plus glacier climbing boots.
What should I bring with me?
Bring warm clothing, a hat, rain gear, and gloves. Gloves and rain gear are not included.
Is the tour suitable for kids?
No. It is not suitable for children under 12.
What language is the guide?
The live tour guide is in English.
If you tell me your travel month and your current fitness level (easy walking vs. regular hikes), I can help you decide whether this is a great fit for you or a better day-trip style activity.